 Expression is a very useful capability of Painter, and it enables you to control your brush stroke in real time. I will mix this with some more of the brushes from Painter 6's new brush engine, as well as some older brushes.
The line airbrush is a very cool brush for creating brushed gradients. Here I set the clone source to a gradient, black at the bottom and white at the top, and used the line airbrush with a spread of 70 degrees. I used a Wacom stylus with a fairly heavy tilt and left-to-right strokes with different colors. In the Brush Controls: Size palette, size expression is set to Source. This means that, the lower I brush in the image, the shorter the lines will be, and therefore, the tighter the gradient.
I drew about 10 lines with colors taken from my estimation of the black body curve (in other words, yellow, through the oranges, to red and then towards black). The result appears brushed, producing a very nicely textured gradient. You can also adjust the spread to make it smaller, in which case the lines become more aligned with each other, like in brushed aluminum.
 Another brush done during the Painter 6 timeframe is the pattern pen. This one uses the Rendered dab type. Here I have set up a source that is a pattern and used the Pattern Repeat technique, and I set brush size expression to Source, like in the previous image. This causes the pattern to modulate the size of the brush, creating a sort of alien beadwork that I interpreted to be some kind of sea weed stalks. To make use of this, I drew some vertical lines and then filled the image with black at 50% opacity, fading back the previous image. Then I drew some more vertical lines. And repeated the process a few times. This creates a murky depth cueing to the stalks, making them seem a bit more three-dimensional.
You can adjust the size and min size from the Brush Controls: Size palette to control the exaggeration of the objects on each stalk.
 The spatter airbrush is a very cool capability, because it really does work a lot like a real airbrush when you use it. The individual spats are deposited using the same three-dimensional projection technique as the camel hair brush, but this time it makes a very convincing spray. To accentuate the results, I set brush size expression to Source and operated in a clone of a gradient with black at the bottom and white at the top. This automatically controls size in such a way that smaller sizes are at the bottom and larger sizes are at the top. Anyway, it's a great way to demo a brush!
The main controls you want to tune are the size, min size, and size expression from the Brush Controls: Size palette. Also, adjust the flow from the Brush Controls:Airbrush palette.
There are various useful options for controlling the size of the stroke in real time. And this is done in the Brush Controls: Size palette. One, as I showed, was to allow the size expression to be controlled by the source (in this case, the clone source).
 Controlling the size expression with Velocity is another interesting option. For this one, you might not want too much change in the size of the brush, so set min size to greater than 25%.
When you do this, the brush becomes bigger as the velocity gets slower (at the ends and sharp turns of the stroke). This creates a highly expressive and designerly stroke. Here I am using it with the digital airbrush, a soft cover variant.
So, the faster the brush moves, the thinner the stroke. This can be combined with a buildup method to produce a very natural kind of marker. It seems to spread when you slow down, like a real marker that absorbs into the paper.
This type of brush stroke is good for handwriting, I believe.
What Can Be Controlled By Expression
 It turns out that there are a limited number of brush attributes that can be modulated by expression. When expression is set up to modify an attribute, it may change in real time in response to the stylus, clone source, etc. You will find these controls right under the attribute that has the option of being expressed. I got the idea for Expression controllers from the patch cords in the early synthesizers.
The Expression pop-up controls the option you choose to express the brush attribute. This means that the option is used to modulate the brush attribute in real time in response to the stroke. Next to the pop-up is an Invert box. This allows you to invert the value of the option (so 1 becomes 0 and 0 becomes 1) before using it to modulate the expressed brush attribute. When the option is Direction, a 1 value is produced when the stroke moves in the direction associated Direction slider and a 0 value is produced when the brush stroke moves in a direction that is perpendicular to this.
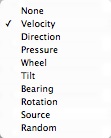 The Velocity, Direction, Pressure, Wheel, Tilt, Bearing, and Rotation options are all derived from the stylus itself or from the physical motion of the stylus. With Velocity, the faster your brush moves, the smaller the value. With Direction, the maximum value is achieved when the brush stroke goes in the direction chosen by the Direction slider. Pressure, Wheel, Tilt, Bearing, and Rotation are all attributes of the stylus. If you have a mouse, check out the Brush Controls: Mouse palette to set these values.
The Source option means to use the clone source luminance. Here black means a 0 value and white means a 1 value. The Random option allows the expressed parameter to modulate through random values between 0 and 1 with each dab of the brush or each increment of motion for a computed brush like the airbrush.
 Size
SizeIn the Brush Controls: Size palette, the size and min size attributes help control the changing size of the brush in response to expression. Note that min size is expressed as a percent of size. Size is controlled by pressure in the example shown here, a buildup brush.
Feature
Also in the Brush Controls: Size palette, the feature attribute controls the feature size of the airbrush spatters and the static bristles. This can be controlled by expression, which is interesting.
Opacity
In the Brush Controls: General palette, you control the opacity of the brush and thus you can adjust it in real time in response to your brush stroke by using expression. Commonly, opacity is controlled using pressure in a digital airbrush.
 Grain
GrainAlso in the Brush Controls: General palette, you can control the grain penetration of the brush into the paper using this slider. This might be the perfect use for pressure, along with the Grainy Edge Flat Cover method, for instance.
Here, though, I have set the grain expression to Source, checked the invert box, and used a clone source that is white at the top and black at the bottom. This creates a direct grain expression in the brush stroke that trends from top to bottom and is cleanly varying.
When using grain penetration and expressing it using pressure, it is sometimes useful to use Preferences: Brush Tracking and then adjust the pressure power until you can get the intermediate levels.
 Jitter
In the Brush Controls: Jitter palette, you control the jitter, which allows you to create a jumpy brush where each dab is placed randomly. This can be controlled by expression as well, which makes it convenient to set jitter to a low value when your brush is traveling slowly. Set expression to Velocity and check the Invert box. This can be convenient when expressing Size with Velocity, as shown with a Buildup brush. It is kind of like grain.
Angle
In the Brush Controls: Angle palette, you control the angle of a squeezed circular dab. The best way is to control it using Bearing, and then it will be oriented with your brush, no matter how you hold it.
Flow
For the airbrush, you can use the flow and min flow parameters in the Brush Controls: Airbrush palette to control the number of spatters that come out as you wield an airbrush stylus. This is like a flow wheel on a real airbrush. So you might want to use Wheel to control it, but Pressure works quite well also.
Depth
In the Brush Controls: Impasto palette, you control the depth of your impasto brush. This means you can express Pressure into depth and press harder to dig harder into the thick paint! It's natural for that.
 Volume
In the Brush Controls: Liquid Ink palette, you control the volume of the liquid in your liquid ink brush. This can make it easy to control the stickiness of your ink with Pressure, and other stylus parameters. A liquid ink camel hair brush is shown with Volume set to be expressed using pressure. You can get the inimitable effects of a brush stroke that breaks up as you let up a little. Very nice.
Resaturation
In the Brush Controls: Well palette, the resaturation controls the amount of color retransferred into the brush as it mixes with wet paint in the canvas. This may be controlled by several parameters that work, like Velocity and Pressure. Set your resaturation slider to a low value to make it more useful.
Bleed
Also in the Brush Controls: Well palette, the bleed controls the amount of color picked up off the canvas. You can define your clone source to be white in the wet areas of your image and black in the dry areas. Then set Expression to Source. Hmm.
 Image Hose Ranks 1, 2 and 3
Expression is used to control the ranks of an image hose. Each rank is usually set up with some attribute such as size, angle, color, or another variety. You can create arrows that point based on direction, for instance. Or you can use pressure to control size or the number of leaves in each clump. The image hose has unlimited uses. Here is one where Direction is used to control Rank 2, which is the color and pressure is used to control Rank 1, which is the size. I used the Mixed Cubes nozzle from the GEOMETRX.NZL legacy nozzle library, which shipped with Painter 4, I believe.
Color Expression
This one has its own palette at Brush Controls: Color Expression. And to controls the color expression. In other words, it controls the color you are drawing with, in a continuous gradation from the foreground color to the background color.
No comments:
Post a Comment