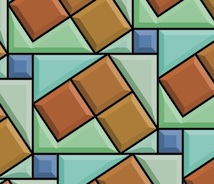
 The Tile Pattern Designer is coming along. In it, you design a tile pattern in a parallelogram repeat block. This gives you quite a bit of leeway, with the ability to design triangular and hexagonal tiles, as shown in Patterns, Part 5. Using a grid to design tile patterns in this way is sufficient to plot out most of the tile patterns from the floor of the San Marco Basilica in Venice, as shown in Patterns, Part 6.
Now I will show you some of its features, all based on complex analytic geometry, which you can learn about in How Does It Work, Part 2.
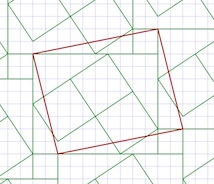 First I design a pattern by drawing lines between grid points. This one took only eight lines, using a slightly rotated rectangle as the basis. I am careful to leave a few unusual shapes for open areas. This is so I can show you how the beveling works later.
I base it on a staggered block pattern, but I also place some rotated rectangles inside the largest rectangle.
I suppose I could have been a little more fancy in my design, but I wanted to show a few of the characteristics that you can control to render your tile patterns. The first, which you are familiar with, is the automatic recognition of closed polygonal areas.
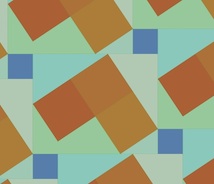 Here I show the polygon areas.
The pattern is really made up of line segments that are automatically divided up. Then they are arranged into a graph, with nodes at the places where the segment ends meet. Then I mark each segment so both sides of it get visited. And start tracing counterclockwise to collect closed polygon areas. The complex part is how to handle holes and stand-alone polygons, but we'll talk about that some other time.
By the way, the graph is special because it wraps around just like the pattern does.
There is a tool to put color into each of the polygons directly. I have chosen an "earth and aqua" color scheme: surf and turf.
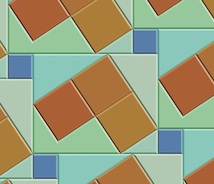 Next I bevel the edges of the polygons. This is actually complicated. It involves a gabling operation as we will see in a moment.
A bevel is shaded using an interesting model which predicts its color in HSV space based on the base color of the polygon and shading from the angle of the edge it is derived from. You can adjust the overall light angle in the interface.
The cool thing about polygonal display is that you only need to create the polygons once. Then you just need to evaluate all the copies on screen within the view. It's a bit messy to do that!
 The bevel width is controllable, allowing you to magically adjust the look of the tiles directly with a slider. For me, it's a bit disorienting to change the bevel width, because I am not used to seeing this occur in real time in the real world.
I have made the computation of the bevel geometries bulletproof, a thing I was not able to accomplish at Fractal Design (and Metacreations) when I was trying to create the first version of this tool.
It appears that I've learned a few things since then! With previous posts, I have created the bevels by hand, by designing polygons on the grid. Now The bevels can be created automatically from the source polygons using a non-destructive procedural process. In other words, they can also be turned off if you like.
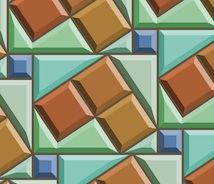 There is also a grout control. This means you can change the grout width in real time with a slider as well. This can make tiles that look a bit more real, since real tiles do have grout in between them.
The grout operation uses the beveling engine, so even if a tile disappears because the grout is so large, it knows not to output it.
And yes, it is disorienting to change the grout width in real time as well! When you move the slider fast, it's just crazy!
And, of course, you can turn the grout off if you like.
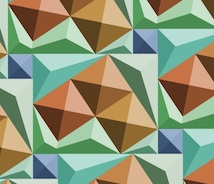 The beveling is completely general. If you crank up the beveling width until it is large enough, the center parts of the tiles disappear. This is why I call this a gabling operation.
The actual polygons output are really equivalent to the computations required by architects when they are producing gables for a roof of an oddly-shaped house.
I'm glad it works, because sometimes the polygon shapes are non-intuitive! It seems to be bulletproof now, and works in the general case. Like I said, I use this same engine for the grout computation as well.
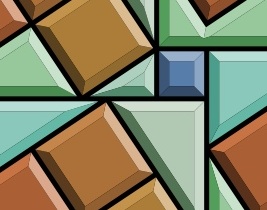 One more problem presented itself when I was building this tool: the matte edge problem. When rendering polygons that abut each other, you get a tiny matte edge. I have made the background black to make this more obvious.
This problem occurs because I am using a standard polygon renderer (CoreGraphics bezierPath) and each polygon is output with anti-aliasing. This means that the edges will have a one-pixel-thick one-quarter-intensity dropout between them.
I remedy this by enlarging each polygon by 0.24 pixels before I render it. This can't really be done properly by stroking the edge (as in Postscript). It must be done by widening the polygon. So I built a widening engine into my tile engine.
All of the other diagrams show the result of this widening setting.
I think next I will do some work in refraction. With just a bit of work, it could look just like stained glass. This would require me to make the results actually 3D. Actually, that's not too hard, given the gabling model I use to compute the bevels.
Perhaps one tile could shade its neighbor. Or a global illumination model could give the rendering a bit more life.
Now, what does real marble look like?
I am reading to know more about this project. We spent Christmas of this year in Venice and I managed to do no-flash photos of St. Marks floor patterns. I am so interested to know if you have an app or program for pattern imaging.
ReplyDeleteEmail me if you can please.
Thanks, Lundy
Literally all the images in the seven-part Patterns series of blogposts and all of the images in the six-part Textures series of blogposts are created using three applications I have constructed for the Mac. While the Texture program is partially taken from an earlier program I built for myself when I was CEO of Fractal Design, the Patterns and Tile Patterns programs are totally new code written entirely within the last year specifically for my blogposts. The Texture program is also almost entirely rewritten (because the operating system changed to Mac OS X). It also features a toolset completely devoted to repeating patterns.
DeleteMy trips to Venice are also described in an earlier blogpost (Patterns, Part 1), which shows that I simply drew out the repeating pattern and topology of the tiles as I saw them (much to the boredom and consternation of my wife, I assure you). I have a notebook with about 50 patterns in it.
Many of the Venice patterns are duplicated in Patterns, Part 6 (using my Tile Patterns application, as it was being developed).
While I would love to share these applications with the public, I am generally prevented from doing so by my employer.
I viewed your web site and I'm very impressed with your designs and your commitment to quality. There are not many places where you can get these kinds of tiles, I think!
--Mark