 This technique can be used to create patterns of bumps, knits, interlocking detail, stone fields, and things I can't actually describe in words! Yes, the only way is to show them in all their intricate interweavings and convolutions.
 In Texture, Part 1, I showed how a speckle pattern could be used to create a set of mutually-avoiding points that tile the plane. Some call them stippling patterns, in fact the brilliant Adrian Secord worked on this independently to great effect ten years after Texture was written. These points automatically fool the eye into thinking there is no pattern to them; no rhyme or reason to their placement. They are similar in configuration to the ways that cells grow. Speckle patterns are a specialized form of tiling texture that uses anti-gravity iterations as a generator, loosely borrowed from the discipline of physics. The theory of the placement of the speckle points is related to the discipline of physiology.
The next step was to show how speckle patterns could create actual cell structure, where each cell was carefully delineated so that its edge could be accurately discerned and could also form the border to the neighboring cells. These are called Voronoi tessellations. You can see them in the diagram above. This comes from the discipline of computational geometry.
I also discussed spanning trees, the interconnection of speckle points to make interesting branching patterns. It is technique borrowed from the discipline of graph theory.
 In Part 2, I discussed the usefulness of Fourier transforms for moving a texture into the frequency domain for the purpose of filtering it, or manipulating its attributes in new ways. This comes from the discipline of signal processing theory, and is akin to the kind of processing required to make radar and MRI scans work.
To the right you can see the frequency domain magnitude plot of the knit-structure texture that I create here. In the frequency domain, features near the center make up the large features of the image. A directionality to the texture corresponds to a directionality in the frequency domain, but rotated 90 degrees.
 I suppose the best thing about creativity is taking something from one discipline and applying it to another discipline. Here, I have taken things from five disciplines and combined them artfully to make a really cool capability for creating new kinds of textures.
I specialize in synthesis.
Crossfades
The first tool I had to create was, for me, the capability to render into a Voronoi tessellation from another texture. And to do it so that the cell walls are invisible. This took some thought, and involves crossfades.
When trying to get non-tiling textures to mesh, one of the not-so-successful techniques is to create a rectangular crossfade.
 This technique creates soft mask edges on the borders of an image, called crossfade regions. You can decide how big to make them based on the typical feature size in your image.
The crossfade regions are rectangles that line the border of your non-tiling texture. The first thing is to fade them back. This means multiplying them by tapering functions. These tapering functions are 1 on the insides of the tile, and 0 at the edges.
Then, take the right crossfade region, and add it into the left crossfade region. This is like applying a soft mask. This assures that the right edge of the tile will mesh with the left edge.
Similarly, take the bottom crossfade region and add it into the top crossfade region.
Note: if you use a linear or a smoothstep tapering function, the general levels of the texture are preserved. The actual preservation of the levels is accomplished by any tapering function opacity = f(x) such that f(x) + f(1-x) = 1.
Once you have moved the crossfade regions over, you must them trim the texture down so it doesn't include the right and bottom crossfade regions. And your texture now tiles seamlessly.
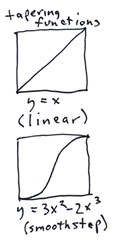 By the way, tapering functions are an interesting subject in themselves. The two most commonly-used tapering functions are shown to the right here. I have mentioned,= linear, which is self-descriptive, and is defined by y = x. This means that the opacity varies linearly across the crossfade region. This may be applied in one of four orientations, of course, depending upon which edge is faded.
The second most commonly-used tapering function is the smoothstep function. It is defined as shown by a simple cubic function. This one has the advantage of having a zero slope at either end of the taper, and so is less visible.
A linear function can leave a visible mach band at each end of the taper. Note also that, at the corners where the tapering functions overlap, we usually just multiply them. This makes trouble for the linear tapering function, though. So sometimes the tapering functions are combined using other means at the overlap.
OK, so now we understand rectangular crossfades. If it's so good, then why don't I use it? Because it's not good, that's why! There are several big drawbacks of this technique. Here are the worst three:
- eyes can see rectangular repeats very easily.
- features don't line up usually.
- the crossfaded region has a smoother texture than the rest of the pattern.
 As an example, consider this captured grain, produced by scanning rough watercolor paper. If you look closely, you can see the horizontal and vertical flaws in the texture near the top, bottom, left, and right edges.
Features do not line up at the flaw edges of the texture, and this is the primary reason we can even see the flaw. Remember, if we use the texture as a paper grain in Painter, that the flaw will be magnified and made even more visible since the paper grain is quite visible in the brush stroke. Once we apply a crossfade to this texture, we should get a clean meshing of edges. At least, there should not be any visible horizontal and vertical edges.
But, after applying a 32-pixel crossfade, which should be large enough to prevent the unnecessary clipping of a 16-20 pixel feature, we can see (below the original) that there is a texture difference at the seams.
 What we see is that the texture is not as contrasty. And the structure of the texture appears to be different at the seams, perhaps smoother.
Such seams are made even more visible because of the rectangular repeat of the tile.
To combat this, we need to examine the actual instruments we use to judge the texture: our eyes.
The photoreceptor cells in the back of our eyes are arranged in a pattern that avoids obvious patterns. If we arrange cells of a texture in a similar way, the repeating pattern may be hidden.
So, conceptually, we replace the rectangular tile with tiles of various cellular shapes: we use the Voronoi tessellation to define the crossfaded cells, and the cells are in turn based on the speckle pattern which defies regularity so well.
Voronoi Tessellation Crossfade Mask Sets
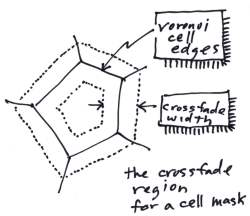 First, a mask for each cell of the Voronoi tessellation is constructed. One such cell is seen at right, conceptually. The cell is pentagonal in nature in this case, and a crossfade region is associated with the cell. This crossfade region is bounded by a dotted line, and has a constant width around the perimeter of the cell.
The region straddles the edge of the cell, and intrudes into the neighboring cells by the half-width. Each neighboring cell has a corresponding crossfade region, that overlaps with this one. Because the crossfade regions straddle the edge of the cell, a cell's crossfade region actually dovetails with the neighboring cells' crossfade regions.
 You can also imagine the cell mask as a three-dimensional surface, where the mask's maximum opacity value is 1 at the center of the cell (within the inside edges of the crossfade region) and zero at the outside edges of the crossfade region. The value of the cell mask is exactly 1/2 at the cell edges.
I create edge functions at each edge that are defined to be 1 at the inner edge and 0 at the outer edge. These functions are clamped to never go beyond the range [0...1]. Then I simply take the minimum value over all the edge functions for all edges of the cell.
But there is one more thing to do to make the cell masks correct: they must be normalized.
Our objective is to simply add up all the masks to produce a clean value of 1 for every pixel of the image. This should work perfectly within the cells, and also along the edges. This is because I have arranged for the edges to be a tapering function. But at the corners where three cells meet, these values will not sum to 1.
So we normalize the arrangement, and this assures us that the entire set of cell masks over the entire tessellation will add up to 1 at every pixel.
Assembling a New Texture Using the Crossfade Mask Set
This part is easy. For each cell, choose a swatch from the source texture, mask it by the cell mask, and add all the masked swatches, within each cell, into the new texture. This produces the new texture.
 But wait, there's more.
A straight addition produces a particular look. To get other looks, I decided on using a z-buffer approach. Here the swatch of source texture is multiplied by the mask (as in the additive approach) but instead of adding in each mask, we take the maximum value at the pixel of all the masked swatch pixels that land on the pixel. This actually can have the effect of changing the apparent edge of the cell.
To right is one such created texture. For this one, I chose an 80-point speckle and a 20-pixel crossfade. I used z-buffering to merge the cells, and this shows the effect of edge straddle on the result: the softness actually provides the zone of wiggle-room for the apparent edge of the cell.
The source texture is a highly softened result filtered by the FFT using a small 20-pixel ring.
 If we use a shorter crossfade, and a slightly offset bright spot for the source swatch, we get this result. This shows the effect of not using edge straddle for z-buffering. In this technique, the mask edge stays 1 to the edge of the cell, and then falls off to zero in a mere half-width. It is this technique that works best for z-buffering.
It might not be apparent, but this is the same 80-point speckle that was used for the last example, but with a different crossfade and also a different edge function.
This result looks like bubbles on a surface and this is a result of using the same source swatch in every cell.
We can also use a different source swatch for each cell, as an option. This is more along the line of actual slice-and-dice, since it's really more of a jumble. But remember, with a random choice it's possible to choose the same swatch twice.

In this example, the additive technique was used for combining the cells, with edge straddle.
This method is useful for creating messy rock field textures and other strewn results.
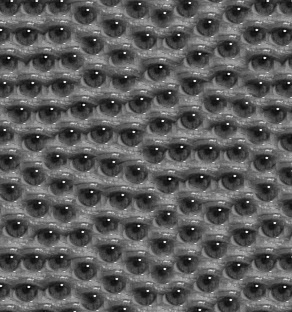
Of course, the ultimate kind of slice and dice work comes from using a recognizable image as the source swatch and making sure it gets used for all cells. Such an example is shows at the end: an eye, complete with iris, pupil, and specular shine. And, of course, a bit of eyelid!
There's nothing that say texture can't work in color, but for now it is a grayscale application designed for the production of paper textures and grains.
 The beauty of texture is that I'm only about 50% finished resurrecting it. It used to have movie capabilities as well, that helped me see what was happening when I changed a control over a given range.
Watching Fourier phase change in an image is endlessly fascinating.
The next part of the Texture series will complete the investigation into crossfade sets and show how you can use this technique to create cross-hatchings.
Then, we will concentrate on the more typical image processing operations that help us do things like anneal the image: operating directly on a texture.
Here's looking at you!
No comments:
Post a Comment