 There are still numerous ways to make textures that have yet to be discussed. One of these, annealing, is particularly visually appealing in a graphic kind of way. In this post, I will discuss the finer nuances of slice-and-dice textures. But first, I think I will show annealing.
To the right you see an annealed texture. The annealing processes based on the technique of simulated annealing. In my interpretation of it, I employ two operations that work against each other iteratively to hone the look of a graphic.
In this case it the first operation is blur. This softens the image. The second operation is increase contrast. This hardens the edges of an image and creates a graphic print look.
 As you iteratively apply annealing to an image, it is converted into a graphic representation of that same image, with clean, smooth, rounded black and white areas. With each iteration, the results get a bit smoother, and small features are eliminated also. Simulated annealing comes from metallurgy, where a bit of metal is heated and softened, and then cooled in increments to create different tensile strengths and even crystallization.
In image processing, I have borrowed the term and used it to create a similar process in which an image can be resolved into its most basic forms, and under the control of the user.

 For instance, this lacunar image is opened in texture, adjusted 15% lighter, and then it is annealed five times using a small 1.82 pixel blur interleaved with a contrast increase with a slope of about 3.9. You see the five steps in the above example. Obviously, this drastically changes the character of the image.
Now, our task is to use several tricks to create the interesting texture you see at the top of this page (well, at least something a bit like it).
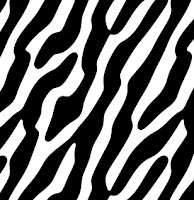
 The trick comes from the Fourier transform. An image of spots may be filtered using the Fourier transform and using the spot-shaped filter on the left. This spot is elongated in the frequency domain, and, as I explained in Texture, Part 3, this makes the image spots (in the spatial domain) elongate in the perpendicular direction. Once this is done, the spots lengthen and merge and the result may be filtered with a notch filter to accentuate the spatial frequency that corresponds to the distance between the spots. This process can create stripes, but when you use speckle patterns to seed it, the stripes don't always line up and they create a cool irregular pattern, like the stripes on a zebra or a tiger.
Another technique, called reaction-diffusion, can also generate this kind of pattern.
 Anyway, here is an image created using speckle-pattern synthesis and Fourier-domain filtering. The brain looks at this and sees patterns in sand dunes.
Actually, once, on the island of Fanø on the west coast of Jutland, I was driving on the large flat beach they have there. On that particular day, the wind direction and speed was in exactly the same direction and speed that I was driving. This made the patterns in the sand, which were pushed by the wind, become stationary relative to the car. Except that they were still evolving: annealed by the force of the wind, countered by the weight of the sand particles. Patterns soon formed and it was quite an experience, I have to say, to watch them twist and turn, evolving and convolving. The experience only lasted for a few minutes, and it has never occurred again, but I think it might still be made on a computer. I'll look into it.
 So, after annealing this pattern, we get a graphic result that matches, but is still different. That's because the pattern does tend to evolve and simplify during the annealing steps.
It is an unusual effect, but I like it.
Though annealing is a metallurgical process, reaction-diffusion is a chemical process, and is readily simulated on a computer. We graphics guys are always looking for new cool-looking techniques to exploit!
And now I think I will exploit speckle patterns some more with some slice-and-dice patterns I made today.
 Speckle patterns, like the one you see on the right, are like stippling patterns, but tiling inside the unit square so they can be repeated indefinitely. This works to my advantage, because Texture is used to create these tiling patterns. Like the paper textures in Painter.
In between the spots, you see the Voronoi tessellation. This partitions the tile into cellular areas. Inside each of these cells, we can place some bit of an image. When that image is the same for every cell, you get a very interesting effect.
I placed a bit of light and darkness into each of these cells, using an additive crossfade between each of the cells, and then I softened the result using a slight lowpass filter using the Fourier transform.
 The texture I got was like a cellular bump texture, but shaded. You can see it to the left here. I get the shading by offsetting the light area to the lower left of each cell, leaving the darker area to the upper right of each cell.
Then I softened the result to make it appear very physically real and realizable.
Then I did something interesting. I created a speckle with about 150% of the spots, so each cell was smaller. This allowed me considerable play in which shaded portion to place in the cell, since I was using the above image as a source.

This technique can make the lines that delineate each cell curved. It's all a function of the z-buffer compositing technique used in merging the cells.
This technique, using a previously sliced-and-diced image as the source for the next one is an iterative technique I used to get more and more complex textures. The trick is deciding which point in the source texture should be used inside all of the cells of the next. It really smacks of genetic programming. I say this because my eye becomes the agent of natural selection as the texture evolves from iteration to iteration.
 Today, while making textures, I had a line pattern (which was wavy in one section) and I used that section to slice-and-dice into another texture, using z-buffering to merge the cells.
You can actually see where the fingers of texture interweave into each other on occasion. This is the value of z-buffering over the additive cell merging method: the texture looks more physically real.
Fortunately this technique scales. Here is an example with 5000 stones laid out in a paving stone pattern (or at least a nice pattern). See if you can find the repeat (it's only slightly larger than the amount I have shown).
 I'm having way too much fun today!
I use high contrast textures in Painter, in combination with custom Drip method variants to produce some very cool 3d effects on the canvas;
ReplyDeletehttp://tiny.cc/v8ag9
Your annealing technique could also produce some interesting camouflage looking textures and patterns.
David
Yes! I see what you mean. Very cool!
ReplyDeleteI still have some old code to port in the Texture series. Like the wrap-around vector field stuff.
Here is a link to a demo movie I made showing the custom Drip variants in action;
Deletehttp://www.jitterbrush.com/videos/LivingOilsDemo.mov
David
Ah, I see. That could only be done in digital media, I think! ;-)
DeleteI like the apparent 3D-ness of the result. The interesting feature of the simulated-annealing technique is that it can really only generate high-contrast results. Glad they're useful! Most (if not all) of the high-contrast papers in the Painter paper texture libraries generated before Painter 6 were done using this technique.
Hello, can I throw in a help request? I was fascinated by the video clip and the effect shown by David, in response to your post. I am try to reproduce it, but I can't get the living oil brush to open. I keep on getting an error message saying an empty library can't be opened. The files are there, but Painter 12 won't see them. All the other brushes I have are working fine...
DeleteIs there any place where I can get some directions on how to fix this? The help file isn't very helpful... and neither is the Painter help page online...
Thanks in advance.
Daniela
Is there perhaps some command to import legacy brush libraries? I did see some legacy importation commands for things like Nozzles and such.
DeleteIs it a brush look? That has import legacy brush look library as a command on the commands pop-up of the brush looks palette.
Deleteno, it's a brush, the one that David, above, used to make that video demo.
DeleteI looked for legacy brush library import options but found none.
I am not even sure it's a brush or a brush library and how to tell the two apart...
Let me tell you (to you of all people) the brush management is really confusing!
I don't know if it was already back then, I never touched the brushes settings, but now it's not straight forward at all...
Thanks anyway, I'll keep on trying.
Daniela
BTW Very interesting posts you have been posting, sorry I haven't been commenting, but they have been way over my head!! But I still love reading them!
It appears that the internal brush structures of Painter 12 have gone to a three-file representation, including a .nib file, that contains the brush mask, a .xml file, that contains all the brush parameters (and there are plenty in Painter), and an unknown file (.stk) that I don't know what it is.
DeleteThe Corel engineers have been busy. Perhaps this happened since Painter 7.
Obviously I haven't worked on Painter since Painter 7, so you would have to ask them is there are any tool for opening or converting legacy brush formats.
Back in Painter 7, when we went from OS 9 to OS X, we began to think about eliminating the mac resource file format and replacing it by a multiple-file format. It looks like that's happened.
And thanks for your compliments about my posts. I'll be posting more on Painter stuff from the past (it appears, aside from the brushes, very little has changed). For instance, all the effect have that dumb preview square, instead of being simply live changes on the document, which is totally possible now that machines have multiple cores and are about 100 times faster than in the old days...
;-)
--Mark