 Liquid media was always visually stunning. During the Painter 5-7 timeframe, my work on the brushes literally went into a different dimension, a different state of matter. In the Painter 7 timeframe, Corel had taken it over and was just beginning to pwn it. In those releases I created some of the most interesting brushes ever to be created, and some of the most useful and expressive brushes.
I have talked about the Painter 6 brushes, with the bristle brushes that got their own life, the line airbrush, the spatter airbrush, and the pattern pen. But before those new brush engine additions, there were some very interesting developments in Painter 5.
 Liquid Media Take 1
One class of brush was made up by the liquid metal and the water drop brushes. These were actually dynamic plugins, which featured their own layer (or layers!) and a dialog with the ability to draw and adjust. The really cool thing was that these brushes produced objects that were editable. I have done this before, with the mosaic brush, and I like the model somehow, because it extends the possibilities available to me.
What makes this tick? ...you might ask. Well, when I was touring with Painter 5, I made no secret of the fact that I was using two-dimensional metaballs to achieve the look.
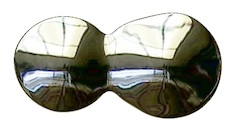 Without getting into details, each dab of the brush is really just a procedural point with a radius and a height. You can, for instance lay down some liquid metal and put another drop next to it and watch as they merge into a single droplet. Then you can adjust size, volume, and smoothness to create different looks with your drops. This was the ultimate in procedural description, allowing non-destructive editing. But of course, liquid metal wasn't the only look. There was also another aspect to it, refraction.
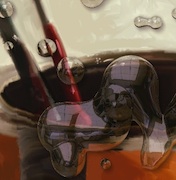 The most cool thing about refraction was the possibility of creating the look of water droplets. We often showed this when we toured with the product. You can see that the picture behind the liquid layer actually refracts and is visible inside of each droplet. I was able to use my experience in the early 80s with building ray tracers to figure out how this could be done.
Notice also that each drop can reflect an environment map on its surface. This complexity and depth lent itself to quite a visual interest. This in combination with the blobby combination of the droplets in a smooth, seamless result gave the user something to think about.
I was always interested in the look of raindrops on glass. As a child, when we drove across country, I would look through a water drop endlessly. Hey, my brothers thought I was peculiar.
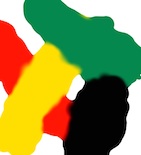
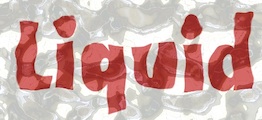 So, for Liquid Metal, I created a Rain button. This randomly deposited drops onto the layer. And as they land, they merge like real raindrops. Eventually it fills up with a wavy surface. Use refraction to see what's underneath it. Here I placed some red text in the background. The refraction produces wavy letters that match the reflections in the surface. Think of it as your private ray tracer. With a brush.
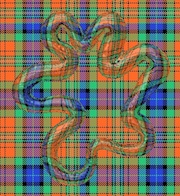 But, speaking of the brush, you can use it to create the same look, but under your direct hand control. Here, a tartan weave fills the canvas but the liquid metal stroke (which is mostly transparent and thus looks like clear gelatin squeezed out of a tube) shows the refraction of the weaving.
 There was a theme going: take the paint and use it like a three-dimensional surface. In Painter 5, we had the ability to create impasto. Although we were just beginning to work on it and it would become a truly great feature of Painter 6, you could see the value in it in the can image.
The Painter can hero image showed impasto effects, and we even had to relax them a bit so they wouldn't get too pronounced. I did the graphic of the Painter 5 can with the impasto surface.
 We were always doing something with the paint can, since it was our product's identity and brand mark. More liquid brushes were featured in Painter 5's palette. And these were quite familiar to the users of Kai's Power Goo. Use a brush stroke to stir the surface of your painting like it's made from liquid itself. Bulges, spirals all of it can be done there. It merely works like a vector field, with each pixel containing a two-dimensional displacement that yields where the source pixel comes from, or at least the vector from the pixel to the source point.
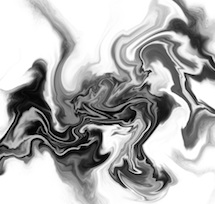 Painter 5 also contained some new brushes that were more conventional because they operate directly on the canvas. For instance the Turbulence brush is a great way of stirring an image like the cream in a coffee. What it does is to place many dabs of the brush randomly into the image (using jitter, of course), where each dab contains a spiral distortion.
This brilliantly simulates turbulent flow, which actually is decomposable into a series of vortices. Actually, that's exactly what the brush does as well! It pays to read up on vector fields.
Painter 5 also contained brushes for dodging and burning, for sharpening and softening, and also for creating a very brushy smear.
 These brushes, like Grainy Mover and the like all use Cellular automata at their core. While other brushes, namely the distort brushes actually were based on marbling. An example of hand-marbled texture is seen here, using Distorto at a large scale, first passed one way, and then perpendicular to it. Several times. Each time, the pattern gets more complicated and more folds appear. Like the finest steel that is tamped and folded over again and again to create a very hard and sharp edge.
So the liquid brushes in Painter 5 utilized a range of technologies to accomplish their liquid looks: cellular automata, vector field advection, ray tracing of reflections and refraction, and two-dimensional metaballs. Friends John Derry, Udo Gauss, and Alex Hsu were all witness to these brushes while in development at Fractal Design.
Liquid Brushes Take 2
During the Painter 7 development period, some new liquid media were developed that really provided some visually beautiful results.
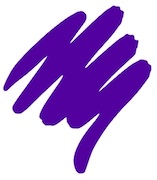
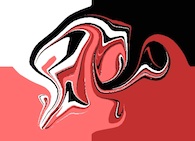
 The basic technology of two-dimensional metaballs was to build up a height field with small functions, perhaps a little like dabs of the airbrush, and create a floating point height field that could then be zerosetted to produce liquid-like edges. But In Painter 7, I added a color value to the height field so that each pixel could have a color. When the dabs intersected, their colors would have to intersect and interpolate as well. This created a bit of color bleed where the ink intersected. The edge of the ink was hard-edged, using a similar technology to liquid metal, and the same blobbiness and merging is present, but the colors mix in a more diffuse way when the broad ink strokes meet.
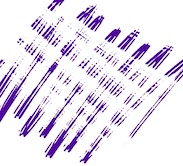 Unlike Liquid Metal, this brush could work with bristles and it had a secret weapon: resist. With resist, you can paint with negative ink. This removes the ink and can thin out areas to create more of a suggestion of the actual ink strokes. It is the equivalent of working scratchboard with ink again. But really, infinitely adjustable.
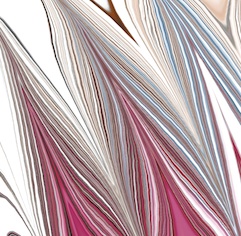
Here, liquid bristle ink strokes are gone over with liquid bristle resist, which carves away the strokes. But the heavy strokes remain longer than the light ones. This is because the liquid ink actually uses a height field. Such a technique, if done even better, might be good for sgraffito strokes as well, where multiple colors can get revealed depending upon how deep you cut with the resist.
I suppose at some point I will have to go into watercolors.
No comments:
Post a Comment