Patterns are found everywhere in nature, from the crystalline structure of the sodium and chlorine atoms in salt to the six-fold symmetry of snowflakes to the spiral arrangement of sunflower seeds. We humans make a habit of copying nature's patterns, and adding a few of our own.
 As we saw in my post on image sensors, a very regular pattern of red, green, and blue photosites is employed to make up the Bayer pattern that nearly all image sensors use. The pattern of green pixels, for instance, resembles a checkerboard.
We take advantage of this pattern to create images using a process called demosaicing. This is the process of turning the mosaic of red, green, and blue pixels into full-quality RGB image data.
Behind the demosaicing process is an art so well-studied that it goes back into antiquity: mosaics. The Romans had two kinds of mosaic work. The first was called opus sectile and the second was called opus vermiculum.
Opus sectile is the laying of shaped tiles to create a beautiful regular pattern.
Opus vermiculum is the laying of tiny tiles (usually in rows) to create a picture. Each tile has its own color and the result gives us some of our oldest color portraiture.
San Marco Basilica
 I once had a chance to visit the Basilico di San Marco in Venice, Italy. Inside it I found every kind of regular tile work I could think of, and a few more. So I took out my notebook and began sketching and detailing all of them.
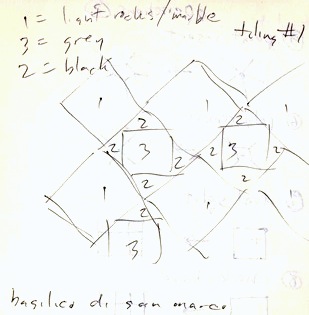
I'll show a few patterns from my notebook. Tiling 1 has diamonds with inscribed squares. The colors give it depth.
I gave each color a number and gave each tile a number so you can color by numbers to get the actual tile pattern I saw at the Basilico. It was actually breathtaking, because there was hundreds of years of artwork located in one place. I could imagine the artisans passing the knowledge of their craft down from generation to generation. Each one had to add something new and novel.
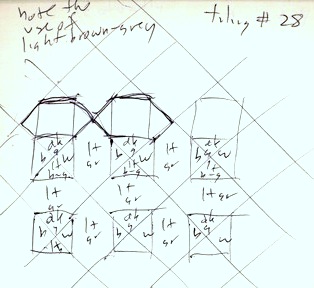 In the case of tiling 28, there was something more than meets the eye in my flat sketch. The colors gave an appearance of three-dimensional form to the flat tile floor.
Here there is a base surround consisting of six-sided tiles all done in a light gray, and a center square, cut into triangles that appears to be a pyramid.
But this look only occurs because of the shading imparted to the square.
And that shading comes from the colors of the marble tiles that make up the floor itself.
I found it to be brilliantly designed.
 Here you can see a hand-drawn image of it, but note that the bottom triangle of the square actually gets a little bit of brown-gray. This makes the pyramid seem a bit shiny, as if the black and white were shadow and specular shine, and the brown was the actual color of the pyramid.
It was little touches like this that drew my eye to each new tiling pattern.
I found and drew up 36 tiling patterns I found there. Yes, I am detail-oriented. But I have to say that the art of Byzantium really did capture my interest.

Within each diamond in the lattice is a tessellation that makes it look like the diamond is really a rectangular hole. The base of the hole is black, and the two sides are set in various grays.
This is typical of the ingenuity of the Venetian craftsmen from the Renaissance and also from the Byzantine era.
The tiling schemes often employed this kind of optical illusion of shading and depth.
It so closely matches some of my sketch work, since I sometimes work in basic shapes.
 This one is from Tiling 19 and once again has hexagonal tiles that form a lighter base.
But this time, the center squares are set as a black square with an inscribed white diamond.
I remember that the tour went on as I stood and took down every kind of tile pattern I could find. I had the sense that it would be quite creative to make a program that could create these kinds of tiles.
And, as the author of Painter, such things were my bread-and-butter. Plus, I wouldn't have created Painter if I weren't obsessed with art, craft, and patterns.
So, my approach was to find a way of factoring the tiling patterns into a kind of topological language, a set of operations that could, when applied in clever ways, produce all the San Marco patterns.

 So, reproduced here is the set of topological operations I thought up that might be able to create the tile patterns.
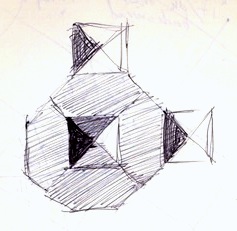
For instance, let's try to make tiling 28 using operations. First start with a big square. Then apply operation 8, checkerboard, to make a bunch of squares inside it. Then, on each internal point where four squares meet, use operation 5, point insert, to replace the point with a diamond. Finally, on each diamond, use operation 4, star, to split the diamond into four triangles.
Then you can color each six-sided shape light gray, and go about coloring the four triangles inside the diamond so that they look like a pyramid.
 Well, actually, I have created tiling 28 rotated 45 degrees, but you see the prices nonetheless.
The more places I went in Venice, the more operations I found might be necessary to create the tiling patterns.
To the left are two more operations I thought would be necessary to incorporate circular portions into the tiles.
Ravenna
After Venice, we went to Ravenna. This is a vertical Mecca for mosaic artists. The mausoleum of Galla Placidia is a total shrine to mosaics. After I had implemented the mosaic tool set in Painter 4, this was a necessary pilgrimage for me.
 In the modern day, opus vermiculum is used quite often when creating mosaics, just as it was in the middle ages.
Here we see part of a floor mosaic I found in Hawaii on the big island in Hilo.
It's use of color and the run-of-tiles technique is straight out of the Ravenna textbook.
Also in Ravenna, I found more opus sec tile work, tiled floors. The Byzantine artisans practically invented this kind of tile. So I got out my notebook again, and started cataloging all the tile patterns I could find.
The Byzantines did like the mirrored symmetries, particularly combined with tilted forms.
 This particular pattern combines rotated squares in a pattern that is mirrored in both x and y, with thin diamond-shaped separators.
Painter Paper Textures
In Painter, all of the paper textures are designed as repeating tiles. The whole idea of repeating tiles is to create a tile where you cannot see a flaw at the edges. I spent inordinate amounts of time working out how to create those tiled paper textures without losing the punch of the texture. At the time, the standard way of making a repeating tile was to use one crossfade between the top and bottom edges and another crossfade between the left and right edges. But this technique always creates a loss of contrast of the paper texture. So I had to invent new techniques that just grew the tiles from scratch.
Some techniques used FFTs (Fast Fourier Transforms). This was convenient because 2D Fourier transforms automatically wrap around. Here's the formula: first salt an image with some kind of texture with a given desired spatial frequency, convert to the Fourier (frequency) domain, randomize the phase, and convert back to the spatial domain. Voilá! Wrap-around repeating tile textures.
Other techniques built wrap-around structures that were used to automatically create wrap-around tiles. Like a Voronoi pattern designed to exist in a wrap-around tile. Then fill the Voronoi tiles with texture. This was used to create the random hatching patterns. But it's complicated, so don't try it at home! You might waste a few years making it work.
 Painter Mosaics
I Implemented mosaics in Painter 4, and to do it I had to solve the problem of offsetting closed polygons, and clipping of polygons against other polygons. This was required to create the grout.
For the occasion of the Painter 4 poster, I created a mosaic called the Miracle of the Paint Can. This took me about 36 hours of laborious work. And I was using beta software, so it crashed a few times along the way, which was quite a bad thing for me since I was on a deadline!
From left to right, I put the portraits of John Derry, Glenn Reid, myself, Tom Hedges, and Steve Guttman into the image.
 Painter Mazes
The maze effect in Painter is designed to create a maze with no discernible pattern.
To do this, I create the maze in a binary representation and then expand it into a Painter bitmap. But to make the maze in the first place, I had to solve the problem of creating a proper spanning tree, randomly connecting spanning trees until there are only two trees. This is to ensure a single unique solution to the maze, from the upper left corner to the lower right corner. Try it!
I first implemented the maze algorithm in 1978 at Calma. It was after taking a graph theory course from Dick Karp at Berkeley, who has since won the Turing Award.
 I Love Patterns
Like this raindrops pattern. One day it was raining and I took pictures of the sunroof of my car. I love how the raindrops avoid each other. It's so organic.
One more picture. This is a note from the Palazzo Pitti in Florence, Italy. It had a tiling pattern that comes from weaving. With the tiles apparently crossing over and under each other. But in this case, the "holes" in between the strands are colored white.
I'm not sure what they were getting at, but I like it anyway.

love the maze. it'll keep my homebound self busy for the night. Thanks! Michelefox09@gmail.com
ReplyDeleteAs a kid of ten, I used to spend my time solving mazes. I used to buy books of them and solve them just to pass my time. Well, that was years ago. But I do remember the manner in which I solved them.
Delete1) find the entrance and the exit. Then locate two places on the outside that absolutely have to be to left and to right of the solution path.
2) trace the walls (not the paths through them) from the outside into the middle, and find the place where these two sides get as close to each other as possible.
3) the solution path must pass between them.
4) by using a binary search technique I can find the path through a maze very quickly this way.
This assumes that there is only one path through the maze. In other words, the maze's walls can be separated into two spanning trees.
I learned this method after solving dozens of mazes. Because at one point it became obvious which way the solution path must go, and what could constrain it on either side.
I also spent time solving jigsaw puzzles. I used a totally different algorithm for that one, which hinged on pattern matching (both of the picture that was divided up into pieces, and of the shapes of the pieces themselves, and sometimes both). Later I used a similar approach when tackling the DARPA Shredder challenge (look it up).
Puzzles are good practice for being a programmer.
--Mark