Showing posts with label image processing. Show all posts

Saturday, February 25, 2012

Mess and Creativity

Organization is important. Without it we could never accomplish any task more complicated than tweeting. We all know intuitively when sloppiness works against our productivity. But at what point does organization work against our creative minds?

I hold that some disorganization, some mess, is required to get to a creative point. If a Rubik's cube couldn't be messed up, then it wouldn't be any fun to solve it. In fact, the messed-up Rubik's cube makes a nice symbol for intelligence in disarray.

While the cube provides some exercise for my mind in solving it, it also suggests that we need a mess to get into an analytical state as well. Or at least to practice our analytical side.

But the real value of mixing it up is to be presented with different things in different contexts. We night never put them together if it weren't for the mess in the first place. No, this is not about entropy and order. This is about the interconnectedness of thoughts. The complex relationships, similes, metaphors, and comparisons that our mind makes when presented with diverse options.

Operations on Ideas

One of my fields is imaging: pictures. When developing new imaging technologies, I come across many different techniques that apply to imaging. But the new techniques come from a specific set of operations on ideas that help me to cross disciplines and make something new.

The first operation is deconstruction. With this technique a problem or a subject is torn apart in different ways so we can see what it's made of. With images, this can be something like moving the image into the frequency domain. Or, it can be thinking of the image as a bunch of tiles, or a mosaic. Or re-representing an image as a Gaussian pyramid. You can think of this as the analytical pre-step in being creative. The more ways you can deconstruct something, the more likely you are to find something new.

A sculpture from Napoleon's Arc du Triomphe
Some years ago at Fractal Design I began getting interested in extracting directions from an image: another way to deconstruct an image. This was in order to create a Van Gogh effect, that represented an image using brush strokes that were aligned to the directions of an image.

This is as good a subject as any to introduce the next operation, random association. For something like directions, these associations are concepts like motion, velocity, vectors, maps, routes, paths, going the wrong way, a drunkard's path, alignment, perpendicular, turning the wheel, etc.

The image processed by representing it as directions
These ideas can lead me to look at things that aren't necessarily associated with images, like vector fields, tracing along a direction path, making directions random, canceling the randomness or uncertainty in directions, and other things that seem to be associated with directions.

I use this to help me in branching out, another operation in creative ideation. If I move from directions to vector fields, for instance, I can then look at various properties of vector fields, like vorticity. I can also look at operations that apply to vector fields, like div, grad, and curl that I might never think of when I'm focused solely on images.

Or, looking at direction as a velocity vector can lead me to realize that it has length and angle. Branching out from this can lead me to realize that a direction's angle can be changed. This has dramatic consequences for imaging, since it can lead to an altered reality.

The next creativity operation is experimentation: varying the parameters.

A picture of a tree can be quite picturesque, particularly one from the Kona coast. But when you take the directions in the image and rotate them all 40 degrees counterclockwise and mix them back into the image, you get a windswept alt-tree.

Very different from the original. By both branching out and experimenting, I have created a new effect and it has some profound visual consequences.

It so happens that this effect was accidentally discovered while working on something completely different (which I can't actually talk about)!

I will show few more pictures for the visual people among my readers.

To right you see a picture of me taken about a decade ago near the Statue of Liberty. Here I have applied maybe a fifteen-degree tilt to the directions.

There is a little bit of windswept effect from the direction alteration. This is just what I was going for, and it is fortuitous. With the Arc du Triomphe image, the directions weren't altered in the least. But there is some uncertainty to evaluating directions and, when this effect is applied at a certain scale, you can see that the smallest details aren't always preserved. If they were, it wouldn't be interesting in the least.

Apply this effect to clouds and make the directions perpendicular to their usual course, and you get a puffy, almost feathery, cloud.

It's a jittery, crazy kind of reconstruction of the cloud image.

This brings me to the last operation, which isn't really about creativity, but you can be creative about how you do it, of course: reconstruction. If you have figured out what something is made of, managed to jumble it up internally, then you can reconstruct it and hopefully not end up with Frankenstein.

Can we apply this to another field as well as images? Of course! In music, I deconstruct songs typically so I can reflect on how they are made. Then I can randomly associate the structure of music with, say, grammar. And I can branch out from the usual song grammar to use multiple linking sections, or to precede each verse with a little prelude (I did this in my song Baby, I). Or rearrange the chords backwards and see how that sounds. I did try recording a backwards guitar part in one of my songs, and the interesting process is chronicled in another blog post.

Or, I can deconstruct music into inter weavings of sound and silence. I can put moments of silence into a song, to create a full stop. Perhaps a fake ending, or just a de-textured rest. Yes, I used this in I Know You Know.

I can deconstruct sound into treble, midrange, and bass and create a wall-of-sound interpretation of music. Or deconstruct vocals from instruments. Randomly associating, I can have the vocals play the instrument parts, like the Beach Boys' Brian Wilson had his band do in Help Me, Rhonda.

One of my favorite creativity groups was the Traveling Wilburys. In Handle With Care, they changed the song structure several ways. First off, the song has 2 bridges. Then the solo comes in the fourth verse, and it's only a half-solo. The full solo comes at the end, after the repeat of the two bridges. After the fifth verse.

The Evils of Organization?

While organization is important to our everyday life, too much organization can also hamper us in ideation. The principle is this: if everything is in its own little box, then you simply can't imagine something that is out of the box. Is this even true?

As impossible as it seems, even obsessive-compulsive people can make great artists. This may be because OCD leads to various interesting styles, like horror vacui. Many indications of "madness" in art have drawn us to them in the past. VanGogh and Hieronymous Bosch stand out in my mind.

And there is a place for neat freak artists as well.

But somewhere in between neat freaks and slobs are all the rest of us just trying to be creative and solve problems in a new way. Bringing a fresh approach to something is what it's all about. And disorder (mixing it up) is just one tool to accomplish that goal. Analysis is just as valid, and it is actually necessary for deconstruction.

To properly deconstruct, you need to take a step back and look at your problem in a new way. For instance, looking at texture as geometry instead of pixels. Looking at stuff in different ways is really the true basis of creativity.

Look at this video of the Traveling Wilburys Inside Out. It's just the band playing, but you can see that they took song lyrics and looked at them in different ways. Thanks to the lyrical talents of Bob Dylan and Tom Petty. And the entire subject is inverted again in George Harrison's bridge "be careful where you're walking".

Check out my blog post on Where Do Ideas Come From to see some of these principles in practice, and the value of operating in a creative group, as the Wilburys did.

Monday, February 20, 2012

Annealing

This post talks about annealing. As I use the word, it is a process that uses iterations of a softening step and a hardening step iteratively in order to achieve an effect. This closely parallels simulated annealing, a metallurgy technique that repeatedly heats and cools metals (or simply liquifies and cools in increments).

One reader, Stefan Wolfrum showed me how repeated sharpening and blurring can create annealing-like patterns, and I must say that I have done this before but I found it to be quite slow. This is also true with reaction-diffusion, which can require thousands of iterations to produce a result.

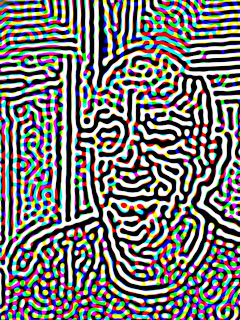
So I tried it again and I found that it was a very time-consuming process. Here is the process applied to a low-resolution image of me.

I had to repeat the process (which I implemented as a Painter script) maybe 50 times before all the areas of the image were sufficiently patterned.

When I tried it on a larger image, I realized that this was a very ambitious undertaking indeed!

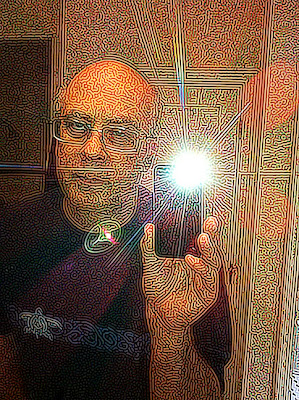
I can take a picture in a mirror with an iPhone (with flash) and it creates interesting lens flares and striations.

Here is the process applied to a much larger image. To complete this one took many hundreds of iterations, at the very least.

I took the result and composited the original image over it using Hard Light to make it more obvious what the image is.

You can see the Hawaiian honu (sea turtle) that is on my T-shirt appears in interesting detail. My hand appears to be rendered in fingerprint style.

The flash produces striations that are rendered in multiple lines.

And there are altogether too many wrinkles in my face!

Notice also the oval lens flare made it into the image. Anything with a form in the image ends up getting rendered in parallel lines and windings.

So, thanks Stefan! I like this method of annealing, but it does appear to be extremely time-consuming.

Here is an example of quick annealing in Texture. I render a pattern using an image-in-cells texture and then filter it repeatedly. Then I anneal it to make it hard-edged. Then I return it to the FFT window and continue to filter it.

The more it gets filtered, the more regular the lines. In this case, the filter is anisotropic.

Once filtered a few times over (maybe four times) the image becomes the very regular fingerprint-like image you see to the right.

The next step if to take this image back to the texture window and apply annealing to it. I adjust the anneal to create about 50% white and 50% black.

Here, to left, you see the annealed version of the same exact image.

But, you may ask yourself, how do I get the lines to follow he directions in an image? This would be done using direction analysis. The usual technique is to use Gabor filters (good luck implementing them).

You can also simply load up a vector field of the directions and use that vector field to process your spotty noise texture. Anneal in-between the direction-field blur steps.

And you can get images like these, but where the lines follow an image. However, the direction field is generally limited to the edges of the image, so you will have to infill the directions using some kind of iteration.

For me, the next thing is to process he annealed texture into a kind of rendering of a sand dune field.

You can see this to the right here. To get this, I used another kind o anisotropic filter that repeats all wavelengths but filters out some directions from the frequency domain image.

This image is quite good looking as sand-dune images go.

This technique can work, I think, on any anisotropic image.

By the way, isotropic means without a prevailing direction, so anisotropic means with some prevailing directions. So a knitted pattern will have the direction of the knitted rows as its prevailing direction. Fabric might have  two prevailing directions.

If you anneal an image that is filtered at a smaller wavelength (higher frequency) you get finer patterns.

Here (to left) is an example of inner patterns.

This technique can be used at larger scales without difficulty.


I wanted to show you a slightly closer look at the dunes rendering. So I did another. I find the lines between the successive wrinkles to be very convincing visually. Even the slight shadings that happen when a fork occurs are nice. With all the shadings, it appears to be quite reasonable as a 3D depiction.

As time goes on, the trick will be to get he striations to follow the lines of another image. And to do it efficiently, a better technique will have to be created.

I do have techniques for extracting directions from images. I think a technique that allows the directions to infill areas that are generally flat will be required as well, in order to get something as cool as sharpen-blur annealing. And be efficient, of course.


Saturday, February 11, 2012

Texture, Part 5

I have often wanted to create cross-hatching using the computer, since it is a favorite drawing technique. In the previous two parts of the Texture post series, I have described how it is possible to create speckles, mutually avoiding points in the tiled plane (like stippling patterns), create cells around each point, cleanly delineated using Voronoi tessellation, then construct crossfade mask sets for the cells, enabling you to place images within each cell to create arranged textures. This technique may be further exploited to create hatching patterns by expressing a hatching within each cell.

Speckle patterns are the key to arrangement in a random, pleasing pattern. And Voronoi tessellations are the key to providing a natural partitioning of the tiled plane into adjoining cells.

But what about the hatches themselves? What function makes them look best? What can be done with them?

The first thing is to control the crossfade amount. This is the amount of softness between the cells. With z-buffer cell merging, this creates a kind of interpenetration of hatches.

Next, we try changing the crossfade amount with linear additive cell merging. This creates a very pleasing regularity like rolling over clay with a roller with evenly spaced ridges, but with different angles in different places.

In fact, the last one is so convincing that we try it with different hatch spacings. Awesome regularity of the pattern quickly becomes chaos. Because we are using hatches that are regularly spaced with different angles, we end up with extremely band-limited results.

It's as if we applied a notch filter to some random texture! But this is not produced using Fourier transforms or notch (combined lowpass and highpass) filters. It is straight linear synthesis.

Also, it's tough to make pleasing hatches that satisfy the eye. This is done by assigning random angles to each of the cells, but looking at the neighbors and trying to not match the neighbors' angles. In fact, once we see the neighbors' angles, we look for the biggest gap and simply bisect that angular gap to create the angle for our cell. It makes for a pretty random-looking result. Pure randomness would not look as random, oddly enough.

If we restrict ourselves to only put out one hatch per cell, then we get a curious pattern of random sticks.

We can vary the number of hatches that occur inside each cell. If we increase the crossfade to a large amount and increase the spacing to a similarly large amount, we get a really complicated mesh of sticks strewn into a pile.

Cut down on the spacing and we end up with a very complex fibrous structure not unlike a kind of matting.

It is very satisfying to see the range of cool patterns that can result from hatching. Other patterns will probably be even more interesting inside crossfade masks.

So now we have a way of making stippling patterns, hatching patterns, and cellular patterns. And we have found that combining the techniques can lead us to incredible texture synthesis possibilities.

I want to end this post with a really interesting texture I created today, using Fourier synthesis. The original source was a hatching, derived from linear additive cell merging with an incredibly large crossfade, and then processed with a notch filter. Finally, I viewed magnitude and changed the edge of the filter to provide some interesting shines in between the main convolutions of the pattern. The result is dark and visceral, like something from H. R. Giger. Enjoy!


Thursday, February 9, 2012

Texture, Part 4

There are still numerous ways to make textures that have yet to be discussed. One of these, annealing, is particularly visually appealing in a graphic kind of way. In this post, I will discuss the finer nuances of slice-and-dice textures. But first, I think I will show annealing.

To the right you see an annealed texture. The annealing processes based on the technique of simulated annealing. In my interpretation of it, I employ two operations that work against each other iteratively to hone the look of a graphic.

In this case it the first operation is blur. This softens the image. The second operation is increase contrast. This hardens the edges of an image and creates a graphic print look.

As you iteratively apply annealing to an image, it is converted into a graphic representation of that same image, with clean, smooth, rounded black and white areas. With each iteration, the results get a bit smoother, and small features are eliminated also. Simulated annealing comes from metallurgy, where a bit of metal is heated and softened, and then cooled in increments to create different tensile strengths and even crystallization.

In image processing, I have borrowed the term and used it to create a similar process in which an image can be resolved into its most basic forms, and under the control of the user.

For instance, this lacunar image is opened in texture, adjusted 15% lighter, and then it is annealed five times using a small 1.82 pixel blur interleaved with a contrast increase with a slope of about 3.9. You see the five steps in the above example. Obviously, this drastically changes the character of the image.

Now, our task is to use several tricks to create the interesting texture you see at the top of this page (well, at least something a bit like it).

The trick comes from the Fourier transform. An image of spots may be filtered using the Fourier transform and using the spot-shaped filter on the left. This spot is elongated in the frequency domain, and, as I explained in Texture, Part 3, this makes the image spots (in the spatial domain) elongate in the perpendicular direction. Once this is done, the spots lengthen and merge and the result may be filtered with a notch filter to accentuate the spatial frequency that corresponds to the distance between the spots. This process can create stripes, but when you use speckle patterns to seed it, the stripes don't always line up and they create a cool irregular pattern, like the stripes on a zebra or a tiger.

Another technique, called reaction-diffusion, can also generate this kind of pattern.

Anyway, here is an image created using speckle-pattern synthesis and Fourier-domain filtering. The brain looks at this and sees patterns in sand dunes.

Actually, once, on the island of Fanø on the west coast of Jutland, I was driving on the large flat beach they have there. On that particular day, the wind direction and speed was in exactly the same direction and speed that I was driving. This made the patterns in the sand, which were pushed by the wind, become stationary relative to the car. Except that they were still evolving: annealed by the force of the wind, countered by the weight of the sand particles. Patterns soon formed and it was quite an experience, I have to say, to watch them twist and turn, evolving and convolving. The experience only lasted for a few minutes, and it has never occurred again, but I think it might still be made on a computer. I'll look into it.

So, after annealing this pattern, we get a graphic result that matches, but is still different. That's because the pattern does tend to evolve and simplify during the annealing steps.

It is an unusual effect, but I like it.

Though annealing is a metallurgical process, reaction-diffusion is a chemical process, and is readily simulated on a computer. We graphics guys are always looking for new cool-looking techniques to exploit!

And now I think I will exploit speckle patterns some more with some slice-and-dice patterns I made today.

Speckle patterns, like the one you see on the right, are like stippling patterns, but tiling inside the unit square so they can be repeated indefinitely. This works to my advantage, because Texture is used to create these tiling patterns. Like the paper textures in Painter.

In between the spots, you see the Voronoi tessellation. This partitions the tile into cellular areas. Inside each of these cells, we can place some bit of an image. When that image is the same for every cell, you get a very interesting effect.

I placed a bit of light and darkness into each of these cells, using an additive crossfade between each of the cells, and then I softened the result using a slight lowpass filter using the Fourier transform.

The texture I got was like a cellular bump texture, but shaded. You can see it to the left here. I get the shading by offsetting the light area to the lower left of each cell, leaving the darker area to the upper right of each cell.

Then I softened the result to make it appear very physically real and realizable.

Then I did something interesting. I created a speckle with about 150% of the spots, so each cell was smaller. This allowed me considerable play in which shaded portion to place in the cell, since I was using the above image as a source.

I ended up with the image you see to the right. This image is even more physically real, with shadows and catchlights on each cell. And because I used the z-buffer crossfade technique with a very large crossfade width, the edges of each cell are compressed into each other in a novel way, like the seeds on a sunflower.

This technique can make the lines that delineate each cell curved. It's all a function of the z-buffer compositing technique used in merging the cells.

This technique, using a previously sliced-and-diced image as the source for the next one is an iterative technique I used to get more and more complex textures. The trick is deciding which point in the source texture should be used inside all of the cells of the next. It really smacks of genetic programming. I say this because my eye becomes the agent of natural selection as the texture evolves from iteration to iteration.

Today, while making textures, I had a line pattern (which was wavy in one section) and I used that section to slice-and-dice into another texture, using z-buffering to merge the cells.

You can actually see where the fingers of texture interweave into each other on occasion. This is the value of z-buffering over the additive cell merging method: the texture looks more physically real.

Fortunately this technique scales. Here is an example with 5000 stones laid out in a paving stone pattern (or at least a nice pattern). See if you can find the repeat (it's only slightly larger than the amount I have shown).

I'm having way too much fun today!