Showing posts with label three-dimensional. Show all posts

Thursday, November 15, 2012

Patterns, Part 6

Tiling patterns are the subject of an application I have written specifically for exploring the San Marco Basilica tiling patterns I recorded in my notebooks in May, 1997.

The original tilings were simply sketched. This is not because I was without a camera. I certainly had a very good one with me. No, I sketched the tilings by hand because the church authorities would not allow photographs in the Basilica!

What mathematicians and others have done is to buy the post cards (I think I have a few of them as well), scan them, and post their pictures online. Usually as a challenge for students to determine which repeating group is represented in the tiling.

You can find all about the regular pattern repeating groups in the Handbook of Regular Patterns. My copy of this book is well dog-eared.

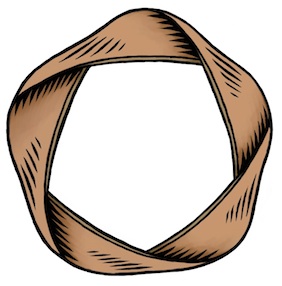
The pattern of five-square C-tiles from an earlier post of mine, Different Perspectives, is seen here. This was an early test case for my new application, which I call Tile Patterns.

This C-tile is one of the twelve pentominoes. All of the pentominoes can tile the plane in one way or another, though some of the tiling bases are a bit larger than this one.

For information on the grid, basis, and segments used to define the tiles, consult my last post, Patterns, Part 5.

My test cases for this application make pretty designs. And some are rather busy in an op-art fashion.

Here is one, which has tiles that seem to simulate cut jewels, which must certainly qualify as a 1990's video game background!

This one broke my program a few times before I got it to work. Mostly because some of the polygons actually have holes in them!

Since the last post, I have implemented a few new things. Before, the application had the ability to set a grid, adjust and specify a basis parallelogram, and draw segments. As you draw, segments appear in all repeats of the basis area.

I have added the ability to divide up the segments when they touch or cross. Then I extracted a set of nodes (all on grid points) that bound each segment. Then I added the code to identify all closed polygon areas. As I mentioned, this includes some holes as well, particularly in the jewel tiling. Finally, the ability to specify the color for each closed polygonal area has been added. This allowed me to create all the tiling patterns you see here.

When I work this way, I only have to specify each polygon's color once, and all repeats of that polygon get colored. So I don't have to (laboriously) do the coloring in Painter. I get a cleaner result also. With this tiling, you can just see the parallelogram basis in red. Oops, I left it in!

Each of these patterns represents a new test case that broke the new application in some way.

The ability to save and restore patterns was the first feature I made. Then, when I built the extraction of polygons, I had to write save and restore of the polygons and their colors. This was an exercise in versioning, since I had saved several patterns already, but only the segments were stored.

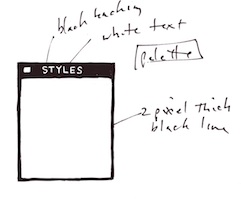
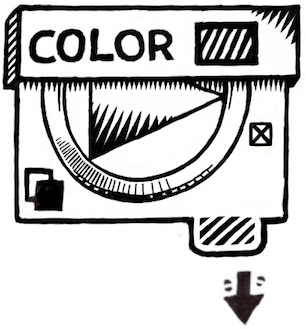
Really what is needed (beyond what I have written so far) is the ability to maintain a palette of colors that is easy to pick from. And an easy way to deposit color into the polygons, with just a click.

The traditional way of doing this, along with adding segments, is a toolbox. Which is kind of passé, when you look at modern multitouch UI.

The ability to edit segments (in case I make a mistake) was another important feature to add.


Without that feature, I would have to clear and start over. Very troublesome!

So a segment selection and adjustment capability was necessary to implement. The requirement was either moving the entire segment or moving one of its ends. I just snapped the mouse point to the grid and looked for a segment end at that point.

For picking in the middle of a segment, I used a pick tolerance (really just a few pixels) to decide if I was close enough to the center of the line to pick it. Still, I had to implement point-to-segment distance, which is the only hard geometric computation.

Having implemented Shapes as part of Painter (and part of ColorStudio), I am very familiar with grid snapping and geometry editing. Actually very little coding was required.

I also used the San Marco Basilica tiling patterns as test cases. The first few patterns are really not as three-dimensional as some of the patterns. I think these were some of the first patterns laid down on the Basilica floor.

This pattern shows a black field with interspersed gray and light brown rectangles. Or you could view it as a checkerboard with turned gray squares inside the black ones.

The challenge for the tilers was to create diamonds that are just rotated squares. The larger light brown diamonds have an edge length that is sqrt(2) times larger than the smaller gray squares. That must have been fun.

The next pattern shows a lattice design.

This design has a brown field with small black squares inside it. Each black square has a gray diamond inside it.

Clearly, the later the tile work was designed, the more complicated it becomes. Notice here that the brown field is actually made of hexagons that interlock. It's hard to show that here, though.

In the real Basilica, the tiles are all made of marble. So there is a strong texture to all of them, and also quite a bit of color variation.

That may be the next thing for me to implement, to simulate the marble texture. Of course I have some ideas on how to do that. Also, simulating the grout will be of importance. That turns out to be pretty easy, since I already have a way to render that (as I showed in the previous post).

With this one, the patterns are getting a bit more three-dimensional.

There's just the suggestion of a square box with a white bottom. This is inside a kind of square corner.

Of course, all the tile work is two-dimensional since it is just a floor.

The tilers took on the challenge of making their work more and more three-dimensional with time. By the time we get to the renaissance, most of the designs were faux three-dimensional designs, as we will see with later examples. Perhaps this one is more like a coat of arms.

The next one shows a feature that is quite common on the Basilica floor: the checkerboard.

Checkerboard occur most commonly in frieze work (borders) and often go around curves on the Basilica floor.

This shows the artisan's skill more than ever.

This pattern is found on the floor, along with some that only feature four checkers on a side.

I figure the high contrast of the checkerboard was a visual stimulant. But in reality, the tilers were influenced by what they could get from the quarries. In the year this was made, there was probably a surplus of white and black marble.

No patterns on the Basilica floor are more striking, or more difficult to create, than the ones that feature circles.

Here I have approximated the circular arcs with polygons, but you get the picture.

The really cool thing about this one is the way the circles intersect each other so perfectly.

Oh, and by the way, you see the pattern is incomplete at the top. Its another bug I'm chasing! You will see this on three or four of the tile images in this post.

Nonetheless, this image shows the magic of tile patterns.

This shows another kind of tile pattern. I think the design has the downwards diagonals in a kind of three-dimensional design to indicate some kind of depth.

And traditionally, the black field allows you to see the other elements as objects on that field.

In this case, the black is less used for shading than for simple depth.

This is another example of a half-drop pattern, as it would be called in Painter. Half-drop patterns are typically used for wallpaper. But wallpaper is really not very long-lasting. Not compared with a marble tile floor, which has been known to last thousands of years.

This pattern was featured in my last post. Here the colors are a little closer to the actual pattern taken from the Basilica floor.

With this one, the illusion of depth and three-dimensional structure is excellent.

The black diamond tile is used to show the inside of a box. The top of the box is shown in two colors, giving it a kind of silvery sheen. The side of the box is in natural wood colors. In all, it is an exquisite pattern.

This one was probably sixteenth century.


This next pattern shows clearly the three-dimensional structure.

The rendering of this pattern also shows clearly the grid at the top, the guide lines, and then the tile colors below.

Actually this is a bug, but I find it to be instructional.

With this pattern, the gray diamonds are the bottom of diamond-shaped pits. The white rectangles are the tops of the lattice. And something new: black diamonds form the intersections of the lattice.

It is visually interesting and also something quite new. Each tiling shows the style of its creator. It shows that the Basilica floor was designed by many artisans over the centuries, and that they were influenced by each other.

This tile pattern is an exquisitely detailed one. It is entirely three-dimensional. One thing about these tilings is that they have the concept of an assumed light source.

This imposes a rule that allows the designer to consistently shade the shapes. Of course this means that several different colors of tile are needed. In varying quantities also!

Various pyramidal shapes inhabit this one and so you see it is a different kind of surface depiction than we have seen so far.

Like the black diamonds of the previous tiling, this one features smaller pyramids (or indentations?) at each intersection. So most likely this one was created after the previous one.

Minecrafters will probably recognize this pattern: the corner cube pattern.

It was certainly not invented in Minecraft, which certainly appeared a few centuries earlier on tile floors in Italy.

It shows most clearly that consistent shading is required to get the best illusion of three-dimensional shape.

This is one of my favorite patterns due to its simplicity and its optically convincing form.

So this pattern is one of the more mature three-dimensional forms, rivaled closely by the next pattern.

This pattern is like the previous, but entirely in pyramids.

Ever seen the pyramids at Giza in a satellite reconnaissance photo? What I want to see here are the shadows of each pyramid being cast on their neighbors.

Well, perhaps that was beyond the thirteenth-century tile masters.

One thing needs mentioning. The tile patterns are quite similar to modern quilt patterns. I have even seen some of the San Marco tile patterns worked carefully into quilts (even with the marbled textures in the cloth). I can imagine them in latch-hook rugs as well.

I think this tile pattern shows that the tile masters were both aware and interested in shadows. The black triangle could be one facet of the three-dimensional geometry. But I think it's a shadow.

I see it as a shadow being cast into the trough that has been carved into the floor only in dark squares of the checkerboard pattern.

Walking on a floor with this kind of tiling, or in fact any three-dimensional depiction in a tile floor, would be a trip!

Literally. I would be worried about getting my foot caught in the apparent holes!

I found many depictions of this pattern on the floors in the old churches of Byzantium. This one differs from the earlier one both in color (four colors are used, subtly) and also in the angles of the squares.

Thus also in the width of the diamonds. They liked to use sixty-degree angles, so the diamonds would be "double triangles".

This one is shown at about fifty degrees. Mostly because I used a relatively small grid to construct it. It almost reminds me of the harlequin pattern, which is really only a diamond grid in a two-tone checkerboard. When you shade it in this way, it becomes three-dimensional, and can fool you into thinking it is a real surface.

This ornament is found on the floor at the San Marco Basilica. It is quite complex!

It reminds me of the American Indian rug patterns found at the Ahwahnee hotel in Yosemite.

But the Venetian tile floor will be still there long after the American Indian tapestries have turned to dust.

Unless, of course, global warming takes its toll and submerges the Piazza San Marco in the Adriatic.

In the meanwhile, let's keep the art and science of tiling patterns alive!

Patterns are a part of our lives. Our clothes, our wallpaper, our tapestries and hangings, our rugs, and many touchstones in our very existence show the influence of art and mathematics. The art of making patterns promotes spatial reasoning and creativity.

These are some of the reasons that I have featured textures and patterns in my blog. Also, of course, they dazzle our eyes and provide for wonderful illusions: the illusion of depth, the illusion of interlock, the illusion of spatial connectedness and completeness.

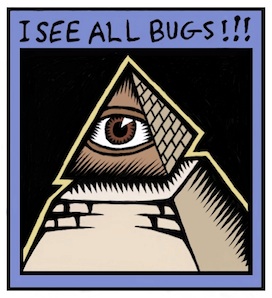
When a tiling pattern has a flaw, we automatically see it.

Patterns are literally built right into our consciousness.

Friday, October 12, 2012

Cubic Nesting

For some reason humanity is obsessed with the cube. We build our skyscrapers based on it. We study its symmetries. We ship products in it (excepting, of course, Painter, which came in a cylindrical package).

Nature has cubic symmetry built right into the salt crystal. And, as we will presently see, many other shapes have cubic structure built right into them, by virtue of polyhedral nesting geometry.

If you snub the corners off a cube all the way to the midpoints of the edges, you get a cuboctahedron.

This shape, shown here, fits perfectly inside a cube and you can immediately see how the corners of the cube may be removed. As far as I know, this is one of the few examples of a 14-face polyhedron.

It is natural in the sense that the cuboctahedron has one face for each face and vertex of the cube.

It has been said that if you pack clay spheres into a space and press them down that each clay ball will have approximately 14 facets.

You could think of the spheres as mutually-avoiding points in space. The polyhedra made by the mid planes between the points would then be a three-dimensional Voronoi diagram.

Another naturally-occurring polyhedron is the rhombic dodecahedron. This is the natural shape of a garnet crystal. It is bounded by 12 rhomboids whose diagonals have the ratio 1::sqrt(2).

The cool thing about the rhombic dodecahedron is that it can tessellate space. So it makes a nice packing form. Honeybees use it to form the cells of their honeycomb.

If you look closely, a cube can nestle perfectly inside a rhombic dodecahedron. In particular, this shape has one face for each edge of the cube.

The rhombic dodecahedron is the dual of the cuboctahedron because you can construct each solid by putting a vertex in the center of each face of the dual. But these are not the only solids that nestle with a cube.

Perhaps the coolest solid to nestle with the cube is the dodecahedron itself. This shape is bounded by 12 pentagons.

This shape is used for the 12-sided die in Dungeons and Dragons because it is a regular polyhedron.

Here, if you look closely you can see the cube nestled inside. In fact, there are five distinct nestlings. This is because each cube edge travels along exactly one of the five diagonals of each pentagon.

This shape is ruled by the golden section: (1 + sqrt(5))/2 or 1.6180339.... This number is the limit of the ratio between successive Fibonacci numbers, defined by the recurrence relation Fn = Fn-1 + Fn-2.

The Fibonacci sequence is 0, 1, 1, 2, 3, 5, 8, 13, 21, 34, 55, 89, 144, ... and it gets used for a lot of different purposes. For instance polyphase merge sorting and optimal one-dimensional searching.

If you connect the four vertices of a cube that don't neighbor each other, you get a tetrahedron. Each of the other four vertices caps a right tetrahedron.

Here I show it as an exploded view. The cube can be made up from five tetrahedra. One is of the platonic form, and nestles inside the cube perfectly (the center one).

This is one tessellation used for better cubic interpolation, it turns out. Diagonals become smooth when you interpolate in this way. Any tetrahedral tessellation converts more easily to barycentric interpolation, which is easier than trilinear, and offers less distortion on the diagonals.

Cubes can also be split into cubes, as everybody knows who has solved a soma cube or played with a Rubik's cube.

Or played Minecraft.

When you split cubes into cubes, you can irregularly cut a cube up into a paired set. This set consists of two pieces that are keyed to each other. The more sub-cubes you split a cube into, the more possibilities for keyed sets exist.

Here is a possibility, one of several, that exist when a cube is split into a 3X3X3 array of sub-cubes.

In all (but the trivial uninteresting) cases, a concavity on one side is met with a convexity on the other.

I have turned one of the pieces by 60 degrees so you can see that symmetry figures into how many of these keys there are.

For those people interested in splitting things up into pieces, you can see my Pieces post. For more secrets of three-dimensional thinking, my Three-Dimensional Thinking post, or my Three-Dimensional Design post.

Cheers!

Saturday, September 22, 2012

Three-Dimensional Design

It takes awhile for a design to unfold in my mind. It starts with a dream of how something can best function, and, with real work, iterates into the optimal form for that workflow. Yet it's not until it assumes real form that I can say whether I'm satisfied with it.

When designing, I often consider the benefit of workflow I have experienced in the past. Consider maps. When I was a kid, driving across the US in summer, I collected maps from gas stations (back when they still had them). I was trying to collect a map for each state. This is when I became familiar with the basics of functional design. A map had to be compact, and yet describe many places with sufficient accuracy for navigation.

I observed how both sides of a map were useful for different purposes. How many locations of interest were indicated with icons. A legend indicated what the icons meant. This was a time of real curiosity for me. Of essential discovery.

Such hobbies as building geodesic domes and technical illustration kept me focused on function for the longest time. But eventually, in high school, I discovered Graphis, an international magazine of graphic design. This struck a chord with my innate drawing talents. And suddenly I was also focused on form.

And then it was impossible function that caught my eye. At Fractal Design, I continued this design philosophy. Here is an illustration from those days, reinterpreted in my modern style that expresses form. A wooden block penetrates through glass. This is ostensibly impossible, of course, but it was in tune with my sense of materials and their simulation in UI.

At the time, I was lost in a maze of twisty passages, all alike: the labyrinth of UI design.

John Derry and I were concentrating on media, and had been since Dabbler introduced wooden drawers into paint program interfaces. Like the paint can, it was a return to the physical in design. Interfaces needed something for users to conceptually grab onto: a physical connotation that made the interface obvious to the user.

One project I was developing at the time was Headline Studio. This was an application specifically intended to create moving banners for web ads. It concentrated on moving text. So when working on a hero logotype, I sketched out these letters. The idea was that, in a static illustration, the letters might appear to be walking in. And the addition of the cursor was a functional cue. This ended up being pretty much what we used.

Every bit of Headline Studio was designed in minute detail. This included many designs that were not used. For instance, I show here a palette that was rejected because it was thought to be too dark.

This brings up the subject of visual cues. To visually cue the user to thinking of a palette as something to adjust the image, we chose simpler designs that those we used for windows. But sometimes we went overboard on palettes, as you know from the Painter UI design.

In the Headline Studio timeframe, we started thinking about three-dimensional UI. We considered different three-dimensional functions. For instance, we considered the window shade.


A window shade is hidden when you want to see out, and you pull it down when you want to block the view. At the time, there was a trend to make a window collapse to just its title bar when when you double-clicked it there. I considered that to be an extension of the window shade.

And by extension, we could turn palettes into window shades so their controls could be accessed only when they were needed.

Eventually this technique was replaced by the expanding list with the disclosure triangle. We liked this because when the list was closed, certain crucial data could be displayed in the list element. The user could thus discover the current state of the most important controls in a quick glance, even when the list was closed.

You get a bit of that here where the current color is displayed even when the palette is rolled up.

And like a real window shade, a small amount is shown to grab and slide down. This sort of technique would work even now in the multi-touch era.

You can also see a nod to the three-dimensional look, because the palette bar has depth. This makes it more sensible to the user that it can somehow contain the rolled-up shade.

The real cost of producing a three-dimensional UI is the need to develop an visual language of controls. Take for example the humble check box.

It has been a box with an X, a box with a check coming out of it, even a simple bump that becomes a different-colored indentation. Eventually the box with the X became a close square in a typical window (though Mac OS X uses little colored balls. Which really are very nice, I think. The close ball uses an X, of course).

But the check box is really an on-off item. It could easily be a ball in a box that just changes color when you tap on it, for instance. On and Off? Red and Green? Or it could be a 1 and a 0.

You become endlessly mired in an array of choices when it comes to this necessary visual language. And some things just don't make sense. Eventually we came to the conclusion that objects were more useful than icons. Because the objects become more readable and their behavior is already known.

When we came to sliders, we realized that they were also used as visual indicators. Having played a pipe organ from time to time when I was a teenager, I found that drawbars might make a nice physical metaphor.

Here is a prototype for the actual sliders themselves. One of the metaphors used was like a ruler with a dot at the end. This dot marked a grab-point. You could tap and grab at that location to extend the slider to the right. This would increase its value. The marks at the bottom give you an indication of the magnitude of the slider's value. Another more drawbar-like metaphor is the glass semicylindrical rod. You can see its magnitude based on the number of lines you cross (and which refract into the rod as you drag them over).

This was an example of form leading function, but it was compelling enough to experiment with. If you turn this one into a real control, it must be possible to have several of them, like drawbars on an organ.

Another way to look at them is as a bar chart. Each parameter has a magnitude that is indicated by the length of the glass rod. The interface is three-dimensional, as you can see. The section to the left of the bars is thick enough for the bars to be embedded into.

Probably the inclusion of even more shadows would make it visually more interesting and also more easy and obvious to interpret.

These are re-drawings of my original sketches from 1999, colored and rendered using a woodcut look.

The idea of using a sticky note that sticks out of the edge of a three-dimensional pad was one simple physical construction that seemed useful. But how? In real life it is used to mark a place. Sometimes it is used to specify where in a large document you need to sign.

Either way, it was similar to a bookmark in the web: a quick way to get back to a specific place that you want to remember

The pad signifies a multi-page document, like a PDF. So, how might this be envisioned in actual use? I actually drew out a few examples. And here is one.

This shows an idea for a storyboard project. The storyboard is the multi-page document, with frames showing in sequential order. Different scenes might be marked using colored tags. The blue arrows allow the user to sequence through the pages in the normal linear ordering.

Probably the colored tags would live in small piles like a sticky pad. The user can click and drag a sticky note from the pad to tear one off and continue to drag the note to the document for use as a placeholder on the current page.

A nice, clean three-dimensional interface for non-linear access to a linear document!

Here's another three-dimensional interface, used for a document window. It's kind of a gratuitous use of 3D though, as you can see. Still, it features an infinitely thin document, like paper, stretched in a frame made up of the scroll bars and the title bar.

Perhaps the red item in the corner is a close box.

Down in the corner is a kind of tactile device used for adjusting the window size. All of these parallel what a window has in it right now, of course, and has always had in it.

It's all about using a different visual language for the UI elements, which is something you have to choose before developing a UI in general.

Here is another, more generic example, devoid of the accoutrements of a title bar. It shows that it might be possible to put transparent stuff into an interface as well.

It is unlikely that I had any idea why I wanted a transparent element in the interfaces (I have colored it green to single it out). It is another example of form leading function.

I am still interested in how such an element can be used, though. It does look cool. It is also possible to make the document itself transparent. This might even be a nice frame for a layer in a touch environment. Consider touching the layer, and then having some controls appear around it. In this case, the three-dimensional interface makes more sense since they are like objects that appear on touch command.

But you can consider elements like the blue arrows in the storyboard example above. They could be made transparent easily, with no real loss of readability. And that would look cool as well.

And what, I wonder, is the shadow being cast on? The elements seem to float in space in the example. It is an example of a visually interesting impossibility. If we were going for true realism, this wouldn't qualify.

And that, in a nutshell, is one of the endearing qualities of three-dimensional UI. It doesn't have to simulate something totally real. It can be magic, simply transcending reality.

The amazing thing is that, as a user, you still get it.

When it came to the Headline Studio packaging, I needed to come up with a way of showing animation on the box: a completely non-moving way of showing animation. I came up with several ideas, but this one stuck in my mind as a good way to show it.

Once again, three dimensional design becomes a useful tool, because it helps to replace the missing dimension of time.

Sunday, September 16, 2012

Why I Like to Draw


Drawing seems like something that is just built in. When I want to visualize something, I just put pen to paper. But why do I like to do that?

It exercises my creativity, for one. And my right brain needs a bit of exercise and use after doing programming all day. But it's more than just exercise I seek.

I also seek to bring what I see inside into some kind of reality. I like the interrelationships between the spaces I see. Positive space and negative space. Three-dimensional space. Containment. Folding. Entrances and exits. Liquid spaces.

All these qualities are enfolded into a single unit: the illustration. I feel there should always be more than one way to look at it because is multi-sided.

It Starts With Media

I have been drawing for quite a while. But I think I learned most of my craft in early grade school. When I went into High School, as a freshman, a friend and I took an advanced Art class and this is when I started drawing ever more ambitious projects. Mostly I worked in felt pen, which suits me even now, since I have been using Sharpie on thick white paper as my main medium. Or at least my main traditional medium.

But I also liked to use pencil. I bought Faber Castell Ebony pencils and thick, rough paper.

It's really this medium that got me started on Painter in 1990. I loved the rough grain and the progressive overlay of strokes to create shading. Shading brought out the spaces I could see in my mind, and made then into real objects.

My main medium has become something quite different now. It is Painter.

Disrupting the Art World?

What happened when Painter was introduced? Well, there were a lot of artists who didn't need to go to art stores any more. This was a form of disruption, I think. But I doubt that art stores will go away any time soon. The traditional media are still quite compelling. And they are probably the quickest way to learn.

Yet disruption is like chopping off the golden tip of the pyramid and walking away with it. The old one crumbles slowly, having lost its luster, and the new one becomes a smaller, faster, better version of the old. And because it's mobile, you can have it in your hand rather than having to go out to the old brick-and-mortar to see the pyramid. In the digital world, this is like digital delivery: you can read the book on your iPad without having to go to the library or bookstore. The advantages are easy to see.

In the same way, Painter has all but eliminated my need to buy pencils. The Ebony pencils I own are ten years old at least.

The Mechanics of Replacing Traditional Styles

I learned to shade in Painter, using one of my first creations, the Just Add Water brush. I would apply colored pencils, which gave me a varied color with grain. In a shade that wasn't too primary. And then I would use the Just Add Water brush and smooth it out into a cohesive shading, like watercolors.

Recently I have taken to a woodcut-like shading technique. It's a bit like engraving. Usually black lines delineate the subject and the shading is applied in a manner similar to the way a linoleum-cutting tool works.

In Painter, I sculpt each of these shading lines separately, often going over the edge of it five or six times.

Drawing From the Mind

But the main thing for me is the form I am drawing, like a two-dimensional sculpture. Many times a drawing is really a projection of a three-dimensional concept onto a two-dimensional surface.

To enhance the rendering, I sometimes employ a "watercolor overlay", which is a layer with a Gel composite method. I can draw into this layer to add color to the illustration. I can use Just Add Water to soften the edges of a color change.

While traditional media are still the easiest way to learn illustration, Painter may be the easiest way to experiment with different media.

Most of my recent illustrations concentrate on three-dimensional relationships. The letter A with some depth, but hand-wrought. Interconnected boxes. A pyramid with an eye in it. Some of these are new versions of my older sketches. But all of them feature some overlap, folding, interlock, or holes.

Take for example this piece. Two S-shaped pieces of rebar interconnect, showing a very small weaving. There is over and under, interlock, shadows, and also shading. It's all tied up in the way I think about things, and what I find interesting.

I draw because I want to show what I'm thinking about. I want to freeze the thoughts and make then concrete.

And the way the illustration interweaves with my text is also quite important. Sometimes the drawing gives me ideas, and even defines the discourse.

Sometimes drawing can be like solving a puzzle to me. I must figure out where the pieces have to go before I can compose them properly. Painter saves me because in the digital world I can draw construction lines and totally erase them afterwards. Or I can draw crudely and then rework edges to make them straighter after the fact. The digital medium is extremely malleable. It has changed the habits of artists since Painter came out. Features like mixed media all in one package, undo, and perfect erase make the digital medium the ideal place to try stuff out for your next illustration.

Inspiring Sources

When I draw, it is therapeutic to me. And the good thing is to produce something you can look at.

The style I choose is a bit like engraving, as I have mentioned. These are inspired in part by the Flora Danica prints and illuminated manuscripts.

Chet Phillips, who has inspired me by his creativity, also likes to use the scratchboard-watercolor style. His imagination in creating characters seems to be unparalleled. And much like in the old work of Fractal Design, old items are repurposed in style and substance to make new fantasies of illustration and storytelling. He even uses magically-transformed packaging to build his works.

More Than an Illustration

The whole package, extending illustration into more than just pictures, is also why I like to write. While an illustration can leave me hanging by a thread when I look at it, a full-blown explanation can cinch the knot tight around your subject and create an artful connection to the reader's mind.


Saturday, March 24, 2012

Drawing On Your Creativity

Creative types are often visual people. And there is nothing more visual than drawing. As the voice is our one built-in instrument for our hearing, so is hand-drawing the main expression for vision.

Using our own hand to sketch out an idea is a natural step for our creativity.

So I constantly draw pictures, drawing on my creativity to help me visualize. And it is a salve for the rougher times of our lives. A bit of escapism. Good for what ails us.

3D Forms

Ironically, it is two-dimensional pen and paper that becomes the practice field for three-dimensional cognition. I know I am constantly drawing forms and shapes, trying to figure them out or reason about their volume. I imagine holding them in my hand, reorienting them, looking at them. And then I draw.

And when I draw, I try to find the proper orientation to depict the object and show its own characteristic features in the best light.

For a cube, I almost never draw it in such a way that I can't see its inherent dimensionality. For a snub cube, I show the snub facing the viewer. Otherwise I probably can't tell what it is. So I reorient the object in my mind to draw it.

I like the idea of something having a real three-dimensional heft to it. I can almost feel the edges around the missing corner.

Other objects are equally interesting. I like, for instance, to imagine how objects intersect, or how other objects can be contained inside them.

It isn't well-known, but the dodecahedrons - both the platonic one and the rhombic one - can superscribe a cube. This shape is the basis of a garnet crystal.

I show a rhombic dodecahedron superscribing a cube. Imagine a cube with short pyramids on each face. Constructing one with pencil and paper is easy, since the height of each pyramid is exactly one-half a cube edge length.

Rhombic dodecahedra can fit together and tile space perfectly like cubes, which I find interesting. And it's also obvious, since the vertex of the rhombic dodecahedron is actually at the center of a neighboring cube.

There are plenty of shapes that I have drawn over the years, most of them are found on the backs of meeting notes or on Excel spreadsheet printouts.

I can't even say what all the objects are, but I did find them interesting to imagine at one point. Perhaps this is a button from an old corduroy jacket.

On the same sheet I found another drawing. What is this trying to be? I imagine it is a folded bit of paper, arranged in a triangle. I never showed its other side, and so that remains a mystery.

At some point, though, three-dimensional figures need to be transcended. This is done by imagination and also by requirement. Imagination and simple tinkering can lead to the impossible figure. Requirement can lead to icons. They are both interesting pastimes and also they can be real work, as we will see.

John Derry and I spent many, many hours searching for the right icons for brushes, for features of brushes, for effects, for tools, for everything.

Impossible Figures

I have written about impossible figures before. But I created one in 1969 based on the impossible triangle. I drew the Triangular Symbol in summer 1969 when I was but 13 years old.

I drew it only a couple of months after my grandfather died, so it was clear that my obsession with impossible figures might have come from my need to process the situation.

It was drawn with a Flair pen on the harshest Olivetti copy paper, so it has colored a bit through time. And the felt pen I used wasn't exactly the best tool to use. I used a drafting set to make the basic shapes. And then I shaded it the best I could, given it is, after all, impossible.

The draftsmen at Lockheed, where my dad worked at the time, were quite impressed and put it up on their walls. But it was a time of downsizing for Lockheed and soon they were laid off.

That was the bad news. The good news was that we picked up a nice drafting table for me, cheap.

Here is the basic impossible figure it is based on. This was originally drawn in 1934 by Swedish artist Oscar Reutersvärd and later made popular by Lionel and Roger Penrose. Though it is impossible, you can create a version of it in real space, made so you can look at it from one angle and it will look real.

This is not so for all impossible figures, though. And these definitely defy imagination. Really, the first impossible figure I ever saw was in the Time-Life book about the Mind.

This impossible figure is the one that the draftsmen liked. Before I showed them the impossible triangle.

They had this figure up on their wall right next to the drafting table as a kind of joking reference to nonsense and I respected them for their humor in the matter.

This figure can't be constructed in three-space because inside and outside exchange places, obviously. If you look at one side and then the other, they are reasonable taken by themselves. But not together as a whole.

In the post Interlock, I discussed the Valknut, a cool figure used by the vikings around Gotland centuries ago to symbolize Odin's patronage of those who died in battle. It is a sacred mark of sorts.

I present here another impossible Valknut, one which intersects itself. This one took a couple of tries, I assure you. It is still a variation of the impossible triangle. I guess I never tire of making these variations.

In some ways, these figures are a tribute to M. C. Escher, the famous dutch artist that perfected the ever-ascending stairway and other impossible illusions.

I love his art! In some ways, I think maybe I'm almost as crazy, if not quite as detail oriented, as Escher. He used his hand to make all his art, and that makes me respect him.

I have often thought of the ever-ascending staircase, and so I have drawn overlapping planks to simulate the feel of the original Escher piece.

I show that they have to be bolted together to hold them in place. But I'm not quite clear on their shapes. I show some warping to the planks so they can fit, but I think it is a bit more difficult to make this work. Unlike Escher, I have preserved their proportions. Escher made his work by having a different number of stairs on the four sides of the stairway. I have used no such cheat.

Still, I try to imagine the exact shapes that will make this work. And to what end? To relieve myself of the boredom of a staff meeting. Heh.

Three-Dimensional Interfaces

In Detailer, which was Painter for painting on 3D objects, I was in the business of creating icons for tools that involved movement and rotation. This was an exercise in three-dimensional thinking and icon development. It's interesting, but Phil Clevenger ended up doing much the same thing when he worked on the Bryce and Poser interfaces. And his designs were much cleaner, I think. And in some ways, much more gothic.

Here you see a cylindrical rotation icon. For rotating a vase that you are painting, for instance. I think the cylinder in the center has to be a glass rod to make it sensible.

But this was only one of many icon tries for three-dimensional interfaces. I soon elicited John Derry's help in creating them.

I think I like three-dimensional interfaces because they simulate real objects that you can use. Like a folder that opens up when you move something to it and whoosh, the thing goes into it.

The virtual trackball for rotating three-dimensional objects on screen is an interesting task for icon creation. I think my first idea was on the left here.

But eventually, it all got screwy. Icon creation is a really hard problem in general, because you have to develop a design language that is consistent and clean and not easily misunderstood: hard to get wrong.

While sitting in endless meetings, my mind would wander. The endless progression of a grid of beans, each with their own shadow is a good depiction of boredom. And a symbol of the sure knowledge that the group will head all together in the same direction. I can see the words bean counter were almost certainly in my mind at this meeting.

This was drawn on the back of a spreadsheet that detailed the booth personnel hours for PC Expo in New York in 1996. It's really kind of funny, put into that perspective.

The Fractal Design sales personnel were well-meaning and extremely organized, so I shouldn't trivialize their hard work. After all, they were where the rubber hits the road! I will forever owe them a debt of gratitude!

At this point, I was still the CEO and we were a public company. But rust never sleeps, and I had products to create. And this includes being creative, even during sales meetings!

A page floats to the ground, its shadow beneath it and showing that it has just contacted the ground, or is about to. A corner is turned up. You can feel the rush of air beneath it, just before the page settles.

Three-dimensional forms in motion.

Nothing is static, all is moving. Trade shows and products must go on, as does life. At this point in January 1996, my life was changing, more like going over a waterfall, and I had just met some of the most interesting people I will ever meet in my life. Drawing, playing piano, writing songs, and even composing poetry: there were lots of issues to work out, and creativity was central to that process. Good times!

Icon Creation

It is very hard work creating icons and with its own design language, it can drive you a little crazy. John and I were designing Detailer icons one day, when we created this interesting bit of art. You can click it to get a larger version, which might be necessary to see it in all its crazy detail.

We were working on trackball icons. In the center, you see a prototype for the sphere with an arrow going around it. But John said that the arrow might best have two points on it, signifying that you could turn the object in any direction.

This led to a happy face with arrows on the mouth. I drew a vase with an arrow going around it, then drew a vase pouring out liquid with an arrow going around it! There is a cube with an arrow. And various circular arrows drawn and obliqued. Then John drew a brush with an arrow going around it. And it just got weirder from there.

Pretty soon there were atoms and icons for the funniest things. Like a dead fish icon. And a dead dog icon (?). And a lightning strike icon. And a tornado icon. The cow is floating around it, saying "moo", by the way.

We had gotten a bit crazy in the process; we tended to do this. How can you be serious when you are creating icons, after all?

You can see a scissors-cutting-paper icon, a road-into-the-distance icon, a submerged pyramid icon, and even a bleeding eyeball icon! I think the comment was that some of these icons were so bad, it made our eyes bleed! No, we weren't actually being serious at the time at all.

One of the icons is the pyramid with an eye in the tip. This symbol is actually on the US Dollar bill. Not sure why. But I liked it, as an impenetrable symbol of, like, a secret society.

I have one that, in its unedited form, says "I SEE ALL BUGS!!!". There is a bit of humor there, since I was talking about bugs in Painter: you know, mistakes in the code that needed to be fixed. We really needed to fix all of them before any release.

This is the standing order of things at a software company. And, as a primary developer, along with Tom, it was always my main responsibility to fix the problems. In the Painter 6 time frame, I did more bug fixing than usual because Tom was preoccupied with other issues.

John and I often made whimsical icons. Like a firecracker icon (John's). Or a lit match icon (mine). These weren't icons that had any purpose being in software, that's for sure! So we were just joking around. Entering the crazy phase. Getting really loony from being in icon hell too long. In think we tried to get more and more outrageous, just as a mode of escapism and perhaps as a kind of performance art: inappropriate art. We loved to do that.

Sometimes the icons were statements of our current situation. If we were buried in some problem that looked easy, but it was actually very, very hard, I'm sure that the iceberg icon could accurately depict our plight.

If we were outperforming our capabilities, or if we just wanted to show off, I'm also quite sure the "goes to 11" icon could make sense of it all. It is a reference to Rob Reiner's movie This Is Spinal Tap.

If we were under water or in deep seas, we might draw the ocean icon. If we were feeling angry at the world, we might draw the gun icon. Totally out of order, gentlemen! This is not allowed!

But at the bottom of it, it wasn't ever really obvious why we drew these. They were just a way of joking around while embedding ourselves and our mindsets in the art of icon creation: an art that has its own purgatory built right into it.

Sometimes Icons are just symbols for something, and can be borrowed from the icon language of, say road signs, or caution symbology.

We also liked to play that game, of borrowing the design language from some other task. It is, after all, what the paint can is based on, and so many other cool things from Fractal Design. It's where design gets fractal.

And at the end of the day, all that mattered is that we achieved our goals to ship a product. To have a product that could rise above the monotony of mundane software products. We showed them how to do it right. We were Fractal Design, after all.

We had a reputation to keep up!

Our brushes had to be the coolest. Our effects had to be the first on the block. Even layers came out first and we made hay with it with make up your mind again, and again, and again. Design is not a linear process, because of trial and error but even more because the client may not like your design. And you may have to produce several designs to show the client. We got that.

Our brushes were cool because we were always thinking of what the designer wanted out of a brush stroke. Not just what the artist wanted. Because we could simulate the natural tools, and we could also extend the capabilities of the artist directly through our new tools.

So what the designer wanted, and what we felt they would like in the future, mattered to us. We were practicing designers: we were Fractal Design.